Keep. It. Simple. Stuffed Chicken.

Isn’t that some advice we all need to take sometimes?  Not the stuffed chicken breast part… the keep it simple part! They call it the KISS principle… but since I don’t feel like inadvertently insulting anyone, I decided to leave the name calling, second “S” off.

So really, who isn’t guilty of over-complicating things?  Keeping it simple means to downsize, to get rid of anything frivolous or unnecessary (whereas you are probably thinking material items right now)… but what else?  I think it means considering what is really, I mean REALLY important to us.  Do we value having a million friends or just a few that you know you can always count on?  Seeing our family more often for short bursts of hectic, mid-week catching up or just having a few quality, focused gatherings with them when possible?  Having a meticulously immaculate home or ignoring some clutter while you snuggle on the couch watching a show?  These are some decisions I have contemplated that have helped me to simplify some aspects of my life that used to bother me a great deal.

Now, for the completely obvious segue:  When I get home from work at 7pm and I have to shower and feed myself some dinner before that quality couch time can occur, that’s when it’s time to remember to keep it simple.  And on a recent particular night as such, I didn’t want to pick up a Wendy’s half-salad, get Chinese takeout, heat up some leftovers, or call my parents and see what they were making.  I wanted to make myself a home-cooked meal.  Therefore, I decided to find the most simple recipe (for a gourmet meal) that I could find.  😉
I stumbled upon this one for Asparagus and Mozzarella Stuffed Chicken Breasts.

There were only 5 ingredients, and one of the ingredients is salt and pepper!  Woohoo!  Winner, winner, chicken dinner.  So I went for it, and here is the recipe and my experience:

All five ingredients... check!

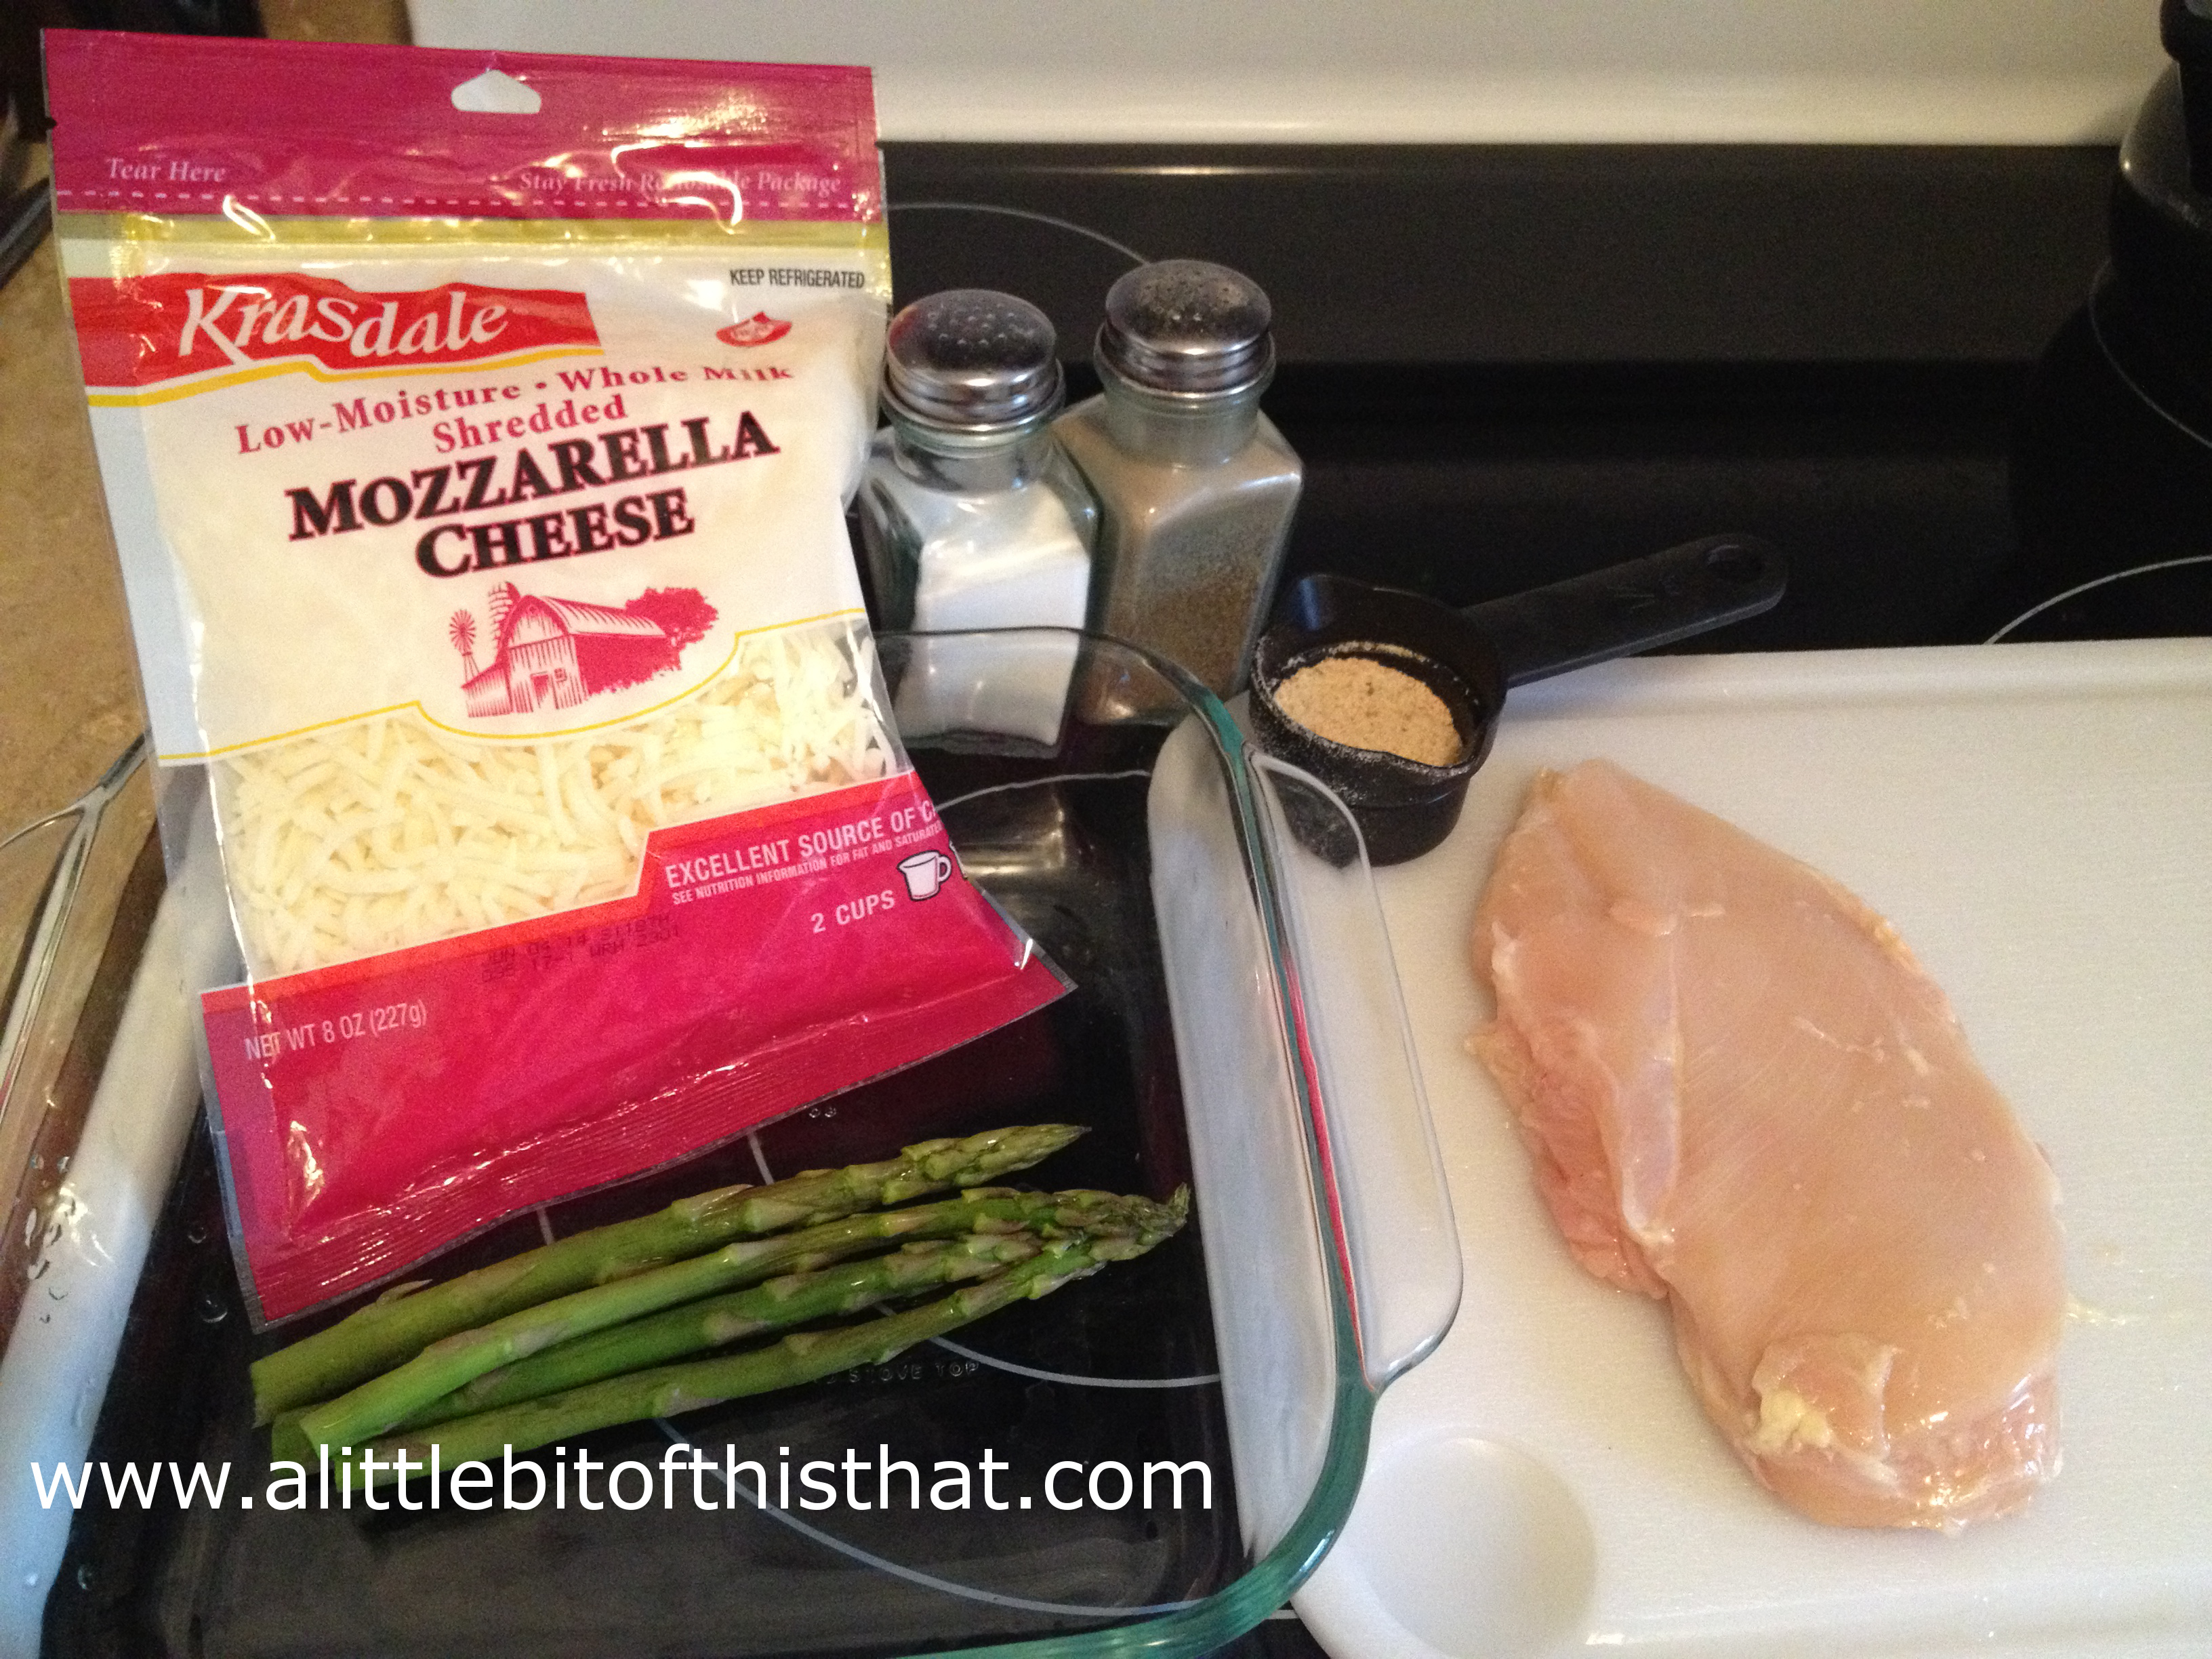
All FIVE simple ingredients… check!

I used salt and pepper on the chicken but I don't think I thinned it out very much... it still worked great!

I used salt and pepper on the chicken but I don’t think I thinned it out very much… it still worked great!

Right before the breadcrumbs and baking... look how pretty it looks!

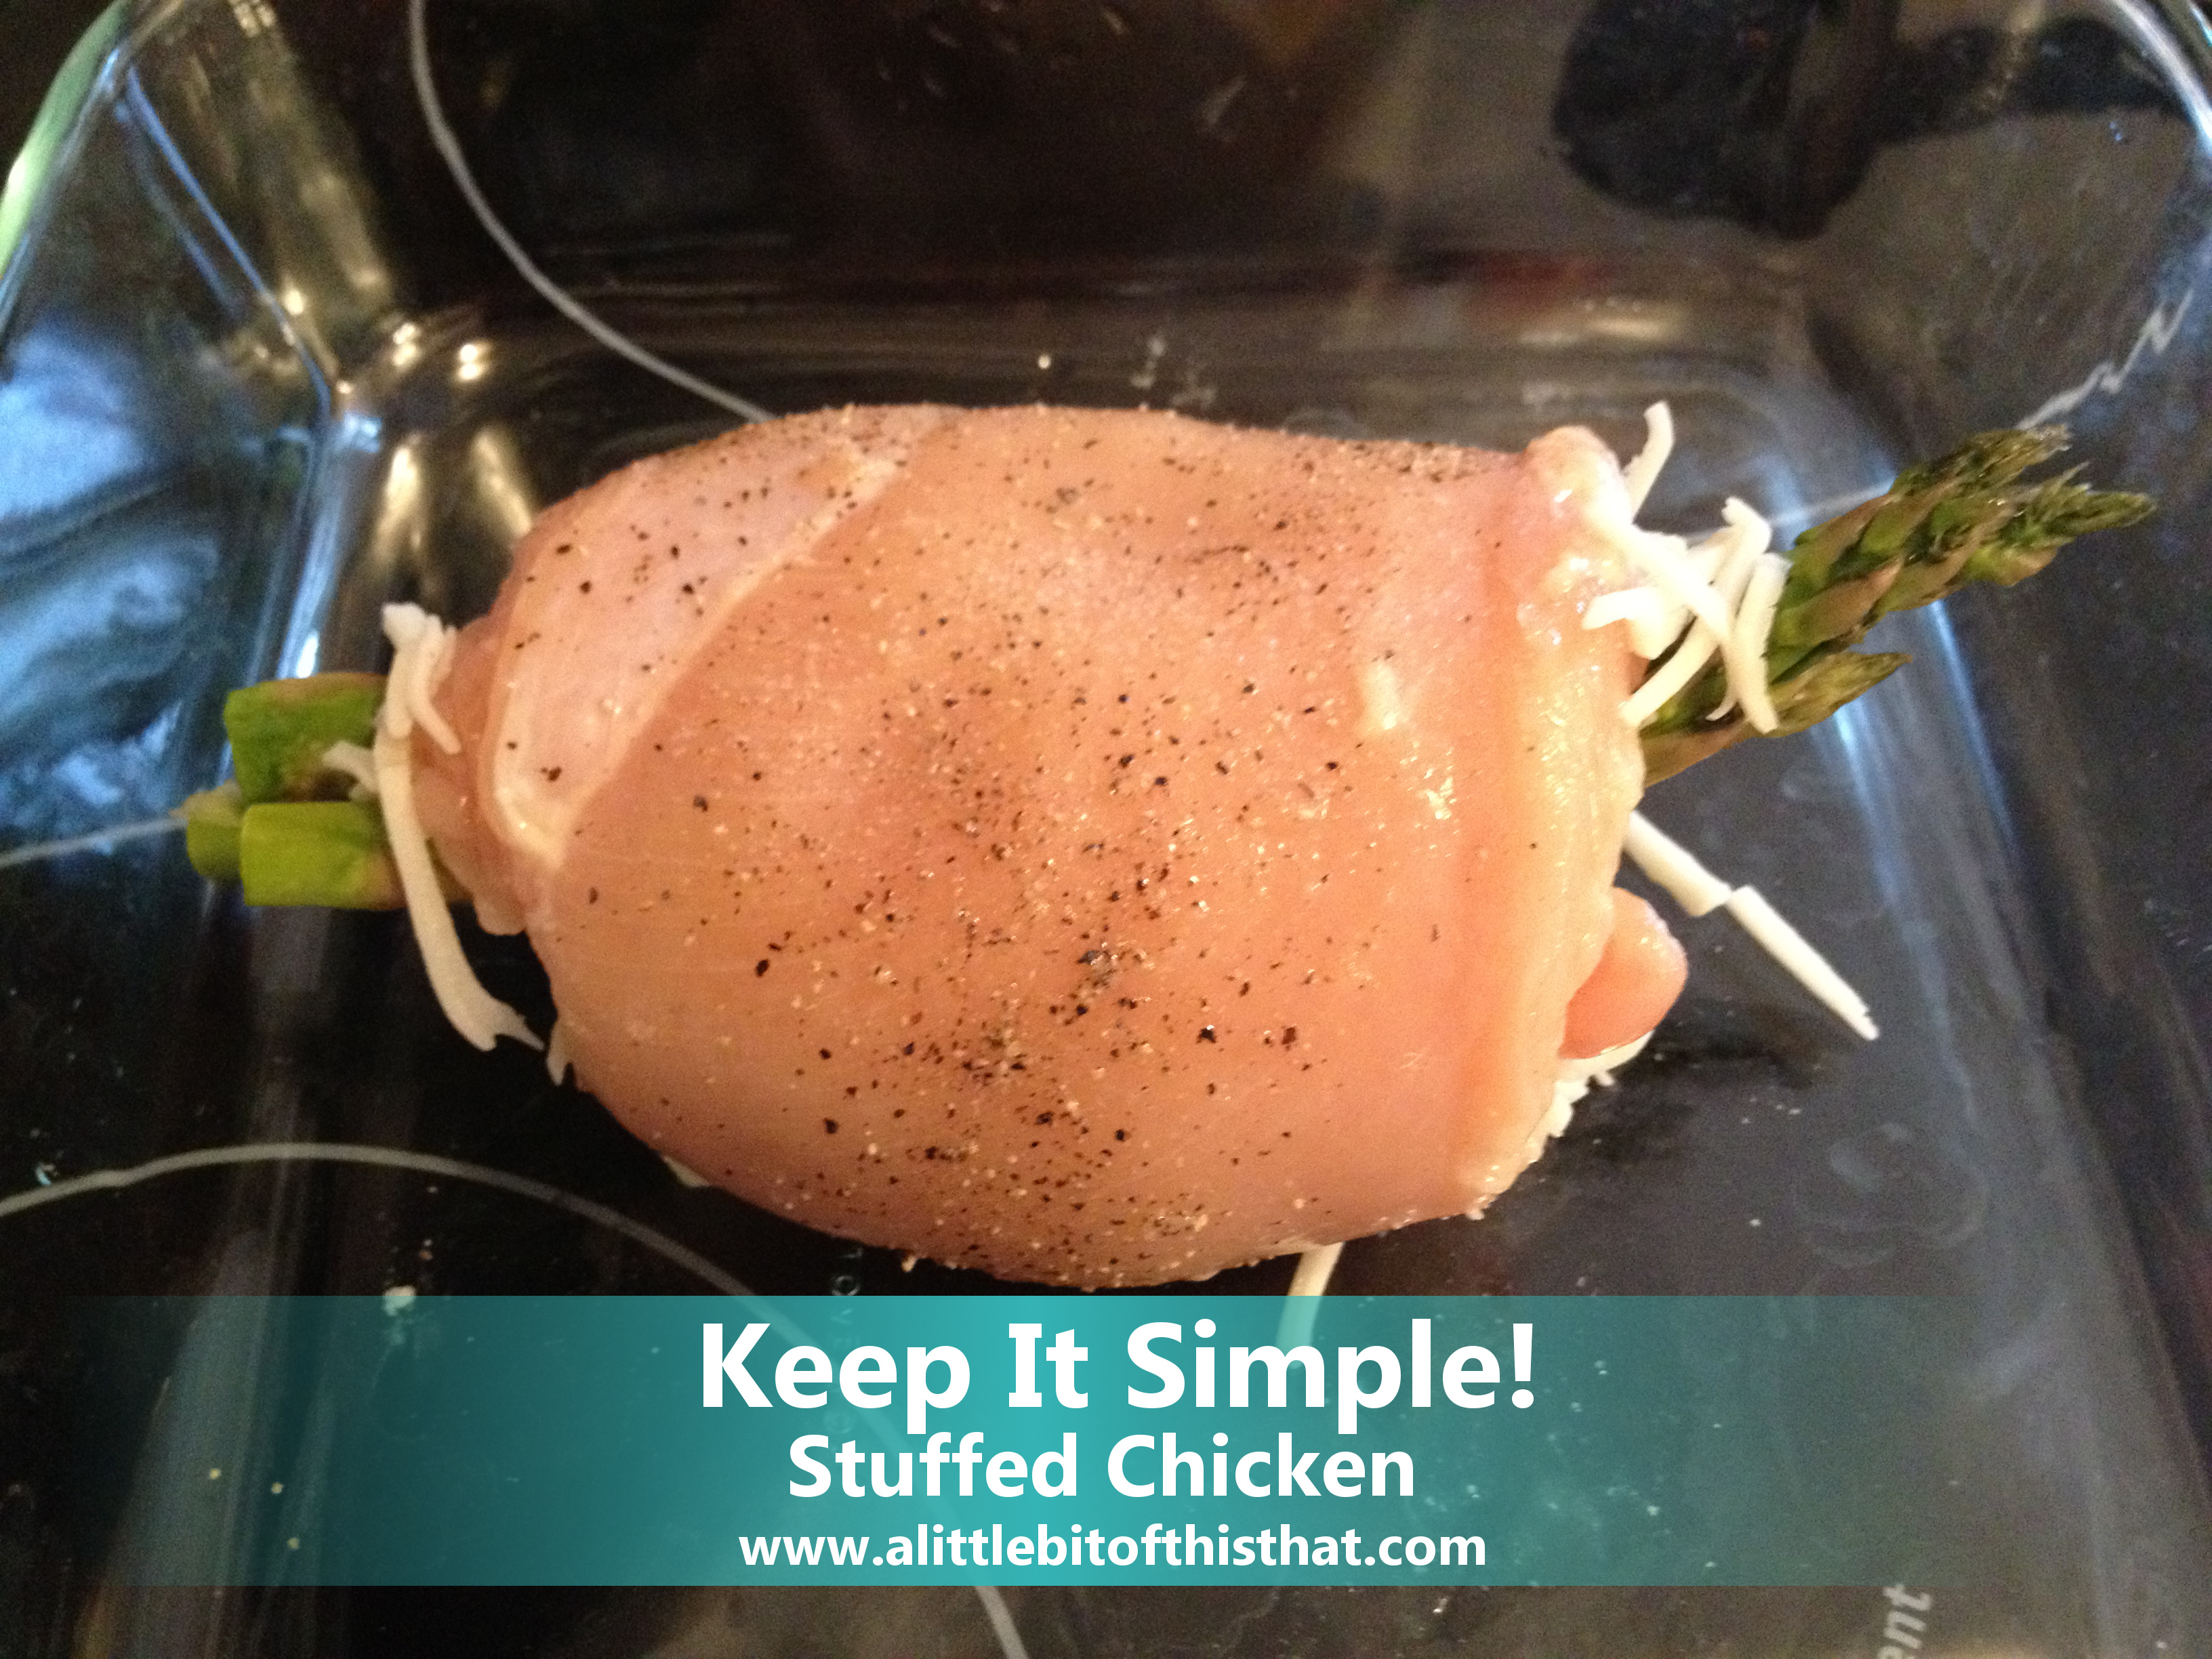
Right before the breadcrumbs and baking… look how pretty it looks!

Directions

  1. Preheat an oven to 375 degrees F (190 degrees C). Grease an 8×8-inch baking dish.
  2. Place each chicken breast between two sheets of heavy plastic (resealable freezer bags work well) on a solid, level surface. Firmly pound the chicken with the smooth side of a meat mallet to an even thickness of about 1/4 inch. Sprinkle each side with salt and pepper.
  3. Place 4 spears of asparagus down the center of a chicken breast, and spread about 1/4 cup of mozzarella cheese over the asparagus. Repeat with the other chicken breast, and roll the chicken around the asparagus and cheese to make a tidy, compact roll. Place the rolls seam sides down in the prepared baking dish, and sprinkle each with about 2 tablespoons of bread crumbs.
  4. Bake in the preheated oven until the juices run clear when pricked with a fork, about 25 minutes. An instant-read thermometer inserted into the center should read at least 165 degrees F (74 degrees C). (Recipe from allrecipes.com)

My Final Review:  It definitely tasted healthy, and wasn’t too bad in the taste department, either!  Many reviews online offer variations that include cooking it with a cream of chicken soup, or finishing it with a sauteed mushroom mixture.  Both sound delicious as well.  Maybe next time… because as you know, I’m trying to keep it simple for now.  🙂

❤ Jessi

Spaghetti Squash “Pasta!”

Spaghetti13MARKED2After a recent farmers’ market trip, I found myself in possession of a 6-inch spaghetti squash.  I had heard quite a few good things about this vegetable including how easy it is to cook.  Well, I can now vouch that the hearsay was extremely accurate!

For my first spaghetti squash recipe, I decided to use it as a healthy substitution in an obvious but classic recipe:  Spaghetti and (Chicken) Meatballs!  I wanted this recipe to be super DUPER easy so I used seasoned ground chicken for the meatballs, and boxed (aka jarred) sauce.   Check out this easy recipe!

This squash size was just fine to feed two people!

This squash size was just fine to feed two people!

Ingredients (Makes 2 servings)

1 Medium Spaghetti Squash

1 Jar of Sauce

2 TBS Parmesan Cheese (plus additional for topping, if desired)

1 LB seasoned ground chicken

1/2 cup breadcrumbs

Garlic Powder

Italian Seasoning

(OPTIONAL:  Bread, butter and garlic for a side of garlic bread)

Directions:

1. Cut the squash lengthwise and scoop out the seeds.

2.  Line a cookie sheet with aluminum foil.  Place squash face up, and brush all sides with olive oil.  Sprinkle salt on the top.

Seeds are scooped out, squash is face side up, brushed with olive oil and some salt. :-)

Seeds are scooped out, squash is face side up and brushed with olive oil and some salt. 🙂

3.  Cover tightly with aluminum foil and bake at 350°F for 20 minutes.  Remove foil, then bake for an additional 15 minutes.

4.  Meatballs:  While the squash is cooking, combine the chicken with breadcrumbs (we also added extra garlic powder) and form into about 1″ meatballs.

meatballsMARKED

5.  Cook the meatballs on another lined cookie tray in the same 350°F oven.  They will take about 20 minutes to cook.  Be sure to rotate them so each side browns evenly.  I usually forget that they are chicken instead of red meat!

6.  Garlic Bread:  If you are choosing to make some garlic bread with your meal, now’s a good time to simply brush the bread with some butter, and add some garlic powder and/or additional Italian seasonings.  Just hold that off to the side and heat it up in the oven about 10 minutes before you will serve your meal.

7.  Sauce:  Get your sauce heating up on the stove – keep it simmering on a low temperature so it doesn’t boil and pop!  Once again, we also added extra garlic powder and Italian seasonings.

I used this boxed "POMI" sauce.  You can find it in a supermarket but I got mine free as a promotion.  The company sponsors a cooking show, Real Food, at the TV station that I work at. :-)

I used this boxed “Pomi” sauce in a tomato and basil flavor. You can find Pomi in a supermarket but I got mine free as a promotion. The company sponsors a cooking show, Real Food, on Telecare, the TV station that I work at. 🙂

8.  If you are timing right, it’s probably spaghetti squash time!  This part was so much fun.  With a fork, you simply scrape the inside meat of the squash.  The more you scrape, the more “spaghetti” you will be left with.

This part was the most fun!

This part was the most fun!

9.  Place the “spaghetti” in either a large communal bowl, or individual bowls ready to serve.  Toss with 2 TBS of Parmesan cheese.

10.  Take out your meatballs from the oven, too!  They should be nice and browned.

Meatballs2MARKED

11.  Put it together!  Put your desired amount of meatballs on top of your pasta and cover with sauce.  Add a piece of garlic bread and you are good to go!

I thought this meal was delicious.  It was such a simple way to sneak extra veggies into dinner, and stay away from pasta!  If you are questioning why I chose to add bread when I had just saved myself the calories from pasta, well, this wasn’t just any old bread.  In my blog post about my trip to the farmers market this weekend, you’ll see that Patrick and I picked up a wonderful smelling loaf of onion bread.  We just simply had to  have some with this meal, so we sliced just a little bit off and it was worth every calorie.  😉

If you haven’t yet tried spaghetti squash (I mean, how cool is this vegetable?!!), then like me, I think it’s time you pick one up and give it a whirl!  It was fun to both make and eat and I am looking forward to trying lots of new recipes with spaghetti squash.

Happy cooking!

❤ Jessi

Spaghetti with White Clam Sauce for One

Image

There’s something about catching your own food that is so rewarding.  That was the task at hand for me on a recent Wednesday evening where I had a bowl of fresh clams in the fridge from the previous Sunday when I was out on the Great South Bay with my family.  We go clamming pretty often so I frequently give clams away to friends, or make different recipes in order to use the clams before they go bad.  Since the clams were in the fridge and not steamed and frozen for future use, I knew that I had to get a good recipe on the stove that exact night or forfeit our bounty.

Now, I’ve made baked clams, clams casino, plain steamed clams with butter, and I’ve shucked and eaten them raw.  The two recipes left on my “Clam Cooking 101” list are a good clam chowder, and a clam sauce over pasta.  I decided to tackle the clam sauce and was extremely surprised and happy with how simple this recipe came out to be!

As a base-recipe, I used this one from the Food Network by Chef Anne Burrell.  It was a bit confusing at first because I realized she was cooking FIVE DOZEN clams whereas I was cooking for one person and decided to go with a dozen clams.  While I chopped down the amount of clams by 1/5, I simply halved the rest of the recipe to ensure there was ample sauce and flavor.  Here is how I made this dish for one:

Ingredients:

One dozen little neck clams

Four cloves of garlic

1/2 cup white wine

1/4 cup water

1 pinch crushed red pepper flakes

1/2 pound thin spaghetti or angel hair

1 tablespoon butter

1 tablespoon parsley

1 tablespoon oregano

Extra Virgin Olive Oil (EVOO)

Parmesan cheese for topping

Directions:

1 – Clean the clams!  I like to leave them in water for a day and let them flush out their systems themselves, and then scrub the shells clean.

2 – Start the boiling process of your salted water in a large pot.

3 – Coat the bottom of a large frying pan with EVOO and half of the garlic cloves.  Saute the garlic on medium heat until the garlic is fully browned.  One thing I learned from Anne Burrell in this recipe is that once the garlic turns brown, you have to scoop it out with a slotted spoon and discard it because it has, “fulfilled its garlic destiny.” (LoL)

4 – Add the water, wine, and clams to the pan and cover.  Bring them to a boil until the clams open up, about 10 minutes.  When clams are opened, reduce the pan to low heat and use your slotted spoon again to remove the clams from the pan (except for about three for decoration).
5 – Is your water boiling yet?  Time to cook the pasta!
6 – After a few minutes and when the clams have cooled, remove them from the shells (shells can be discarded) and give them a good chopping on a cutting board.  Add them back into the pan with the butter, herbs, and a pinch of crushed red pepper.
7 – When pasta is al-dente or cooked to your liking, strain and then add back to your large pot.
8 – Top the pasta with the clam sauce, but be sure to pour slowly and use your slotted spoon once again to assist the clam pieces out of the pan.  Also, make sure to sacrifice the last bit of sauce by leaving it in the pan to be discarded, as it may have excess sand or dirt in it from the clam shells. Toss the sauce and pasta together until they cling to each other and the pasta is equally coated.
9 – Dish your serving into a bowl and add some parsley, Parmesan cheese, and the few clams that you put aside earlier for garnish.  Serve with a slice of garlic toast if desired.
That’s the easy-peasy white clam sauce recipe that I slapped together in 20 minutes on a weeknight and definitely plan on using again!  Enjoy!

“Working with what you’ve got” = Homemade Pork Fried Rice

I hope you had a chance to read all about the wonderful upstate N.Y. town of Lake George and my recent vacation there!  Well, before we (Patrick and I) went away, we chose not to go food shopping for about two weeks prior.  It was a challenge that we took upon ourselves to both save some money for vacation, and to try to empty out our freezer, fridge, and pantry of the items that we seem to pass over when planning dinners.  The goal was to work with what we’ve got.

As we scoured the freezer to see what we were working with, we decided to start with a package of thin-sliced boneless pork chops as our base.  Now, in the man’s brain he automatically went to pork chops on the barbeque with mashed potatoes.  My female brain (as most female brains probably are) decided to start checking out the endless condiments that we have on the door of the refrigerator.  Hmnn… we have a wok, and I once made beef mei fun (thin rice noodle) so I had plenty of leftover asian sauces, and there are peas in the fridge.  The only thing I had to buy were the scallions.  Bingo!

I proposed the idea of pork fried rice.  “With what else?” Patrick said to me.  “No, that’s the meal,” I countered. “It has meat, grain, and veggies all in one.  It’s perfect!”  And that is how I got my way and how the following recipe is here for you.

Homemade Pork Fried Rice... Delish!

Homemade Pork Fried Rice… Delish!

Ingredients (This will feed about 4-6 people comfortably, as a full meal – or more people as a side)
One package (Ours was almost a pound and a half) thin boneless pork chops

6 cups white rice

8 eggs

One package frozen peas

One small cluster scallions

Sesame Oil

Oyster Sauce

Soy Sauce

Directions

1.  Bring six cups of water to a boil in a large saucepan.

2.  While the water is boiling, slice the pork chops into thin strips or small cubes (to your liking), and place in a dish with oyster sauce to marinate.

3.  Cut the scallions into rings and place aside as well.

4.  When the water boils, add the rice, cover, and remove from heat.  In 10-12 minutes, check back on the rice and fluff it with a fork.

5.  Time to cook with the wok!  You could probably do most of these in any order but here is the order I did:

6.   Scramble the eggs in the wok, place aside.

7.  Line the wok with sesame oil.  Cook the marinated pork until just about well done, place aside.

8.  Cook peas and scallions until just about well done – leave in wok.

9.  Coat the wok with more sesame oil.

10.  Add your previous ingredients – eggs, pork, and rice and mix together!  (We needed to do this in two different batches!) Keep the heat on, and add more oyster sauce and soy sauce to your liking.  Toss and mix around ingredients frequently.

Here are some pictures of my experience:

Pork chops... never my first choice of meat for some reason but this recipe tasted great!

Pork chops… never my first choice of meat for some reason but this recipe tasted great!

Here are the sauces I had leftover that I used. :-)

Here are the sauces I had leftover that I used. 🙂

Eggs First

Eggs First

Meat second...

Meat second…

Veggies third!

Veggies third!

Everything together!

Everything together!


Not your normal ice cubes :-)


Standing on the line at our most recent grocery store trip, Patrick was flipping through a magazine.  When the magazine ended up on the conveyor belt along with our other groceries my first instinct was to say, “do we really need that?”  I mean, I’m no sucker to all of those check-out line temptations that stores strategically place there to bump up your bill. 🙂 But, let it be known… I didn’t scold him.  Instead, when I saw the magazine choice I just looked over at him and smiled.

It wasn’t like it was a Sports Illustrated swimsuit edition (okay, so I did catch him reading that one in CVS once, but anyway…) it was none other than one of our favorite chef’s magazines, Rachael Ray Everyday.  I let the $5 magazine get scanned and put in a grocery bag despite the fact that the purchase would completely negate my strategic $4 worth of coupon savings that I brought with me.  (Two .75 cent coupons for paper towels and toilet paper that would get doubled to $1.50 each for a total savings of $3.00 and a $1.00 off the purchase of three Lean Cuisine coupon.)  Oh well, I guess my careful savings just about bought us a magazine. 🙂

So anyway, some background info on my slight obsession with Rachael Ray.  First off, I just think she’s great – chef, businesswoman, brought herself into the spotlight with hard work and dedication…  I hope my hard work pays off one day too!  Plus, Patrick and I also feel this sort of “upstate” connection with her.  Rachael was born in upstate New York in a town called Glens Falls, which is just south of Lake George. Then, she eventually moved to the village of Lake George.  Ready? Here goes our connections: My mother’s side of the family has vacationed up there and owned a house in Bolton Landing since way before I was born (my aunt/Godmother also lived, worked and raised a family in Glens Falls and got married in Lake George).  Patrick’s family vacationed there year after year as well at many different hotels and lodges and recently purchased a beautiful home on the east side of the Lake in a town called Fort Ann. Okay, that’s about it, but hey it’s enough.  We love Rachael! haha (oh I guess I should also mention that some people think I resemble her that my voice is also a little raspy like hers).  Hence, we are big fans.

Anyway, onto the recipe! So I found these suggestions for flavored ice cubes in this particular edition.  Some cube recipes weren’t my type at all, but I did try out two (simple) varieties. My choices were: “Inside Job” and “Bee Delighted.”  Here are the recipes, my photos, and the reasons why I chose these two options!

1 – Inside Job – I chose this ice cube because I looove dirty vodka martinis, but lord knows drinking them straight up can put you, well, on your butt!  I usually order my dirty martinis in a “tulip” glass with ice.  WELL, well, well… imagine my excitement when I realized I could make ice cubes with olive juice for my martinis on the rocks.  I instantly had to have it!

Directions:  Place an olive in each section of your ice cube tray.  Top with water and olive brine (olive juice) and serve in your martini. 

In the words of RR: "Yum-o!"

In the words of RR: “Yum-o!”

2 – Bee Delighted – Another beverage I love is hot tea.  I grew up drinking regular Lipton tea with milk and sugar, but also crave a nice green tea with honey and lemon sometimes.  The problem is, without milk the tea is SOO hot for so long that it’s hard to drink!  These ice cubes are awesome – they provide sweetness and cooling in one!

Directions:  Dissolve one part honey in three parts hot water.  Let cool, then pour into a tray.  (You know I did more than a 1:3 ratio, right? Of course…)  😉

I use store brand honey on the regular... works for me!

I use store brand honey on the regular… works for me!

TIP: As you see below, I used only one ice tray.    I think Patrick would have been very mad if I used all of the ice cube trays to make flavored ice cubes.  My only suggestion is to just be careful when putting it in the freezer to not tilt the tray and mix them!

Perfect example of "A little bit of this... a little bit of that!"

Perfect example of “A little bit of this… a little bit of that!

Additional side note:  You will notice there are 9 olive cubes and only 7 honey cubes.  FYI, olives should always be served in an odd-number (I kind of stick to the same rule with cherries too).  I have no idea why, it’s just something I learned along the way.

Cheers!

❤ Jessi

PS – We have since subscribed to Rachael Ray Everyday magazine for two years, for only $20.  Woohoo!  Get the deal here!

Red, White, and Blue Rice Krispy Treats!

First off, happy July 1st everyone! 😀

So I ask this question in all seriousness… is there anyone who doesn’t like rice krispy treats?   As a young kid I absolutely loved when my mom would make them and my highlight of going to Walt Disney World was getting the mickey-mouse shaped ones (my sister and niece recently brought my back one as a souvenir… yes!!).  Even at my age I have a hard time going to Starbucks without buying a marshmallow dream bar…

For months now, I’ve had this recipe pinned to my Fourth of July Pinterest board and have been dying to make them!  They are just so cute and I know they will be a hit at any 4th of July (or Memorial Day!) gathering.  The original recipe links to lilluna.com‘s blog.  Here it is, and here’s my experience making this delicious childhood-favorite dessert.

Ingredients:

6 cups Rice Krispies

1 Package Marshmallows

3 tablespoons butter

Red and Blue food coloring

Directions:

Well, here was my first mistake right off the bat:  I greased a 13×9 pan because, well, mom always made them in that size pan!  The recipe (in addition to the fact that you will be stacking the three colors) is small so I’d suggest either double the recipe or realize you will only get 16 small pieces.

PanMARKED


Back to the recipe:  First, separate each of the ingredients into 3 sets, each set consisting of  2 cups cereal, 1 tablespoon butter, and 1/3 of the marshmallow bag.

On medium-low heat, melt the butter.

Melt butter and then add marshmallows.

Melt butter and then add marshmallows.

Add marshmallows and stir until they are completely melted.

They are beginning to melt, yay!

They are beginning to melt, yay!

Then add rice krispies and food coloring, stirring until they are completely coated and colored to your liking.  (I would stay away from using anything flimsy to stir with… mixing these puppies can get difficult so you’ll need a sturdy spoon or spatula…)

Beginning with the color you want on the bottom, spread each of the mixtures into your greased 8×8 pan.

Layer the batches with "white" aka no coloring in the middle.

Layer the batches with “white” aka no coloring in the middle.

All three layers!

All three layers!

Let these babies cool then slice them up and enjoy!

Halfway through slicing up my treats I realized I only have 9 small pieces so far!

Halfway through slicing up my treats I realized I only have 9 small pieces so far!

The final product! Lots of compliments :-)

The final product! Lots of compliments 🙂

TIPS AND TRICKS:

I’d advise doing these one “color” at a time but if you are short on time/impatient like I was, I ended up doing all three layers at the same time (Honestly, I started with one and when I got bored watching butter/marshmallows melt I decided to go gung-ho. Ahhh!!) There was a point that it got a little crazy and I had to call the bf in to help get stir the krispies and keep them off the heat so unless you have help I’d say do them one layer at a time.

ThreePans

All three layers cooking at once can get a little crazy!!

Enjoy your treats and have a happy, healthy, and safe Fourth of July everyone!

❤ Jessi

Rate this recipe!

Grilled Balsamic Skirt Steak and Friends


The other day I was truly stumped with what to have for dinner.  I knew Patrick was home and would be asking me very soon what I was thinking.  So, I sat down in my cubicle (don’t worry, they are big cubicles) and typed into Google “What’s for dinner?” hoping that Google would provide me with the magic answer.

Well, low and behold I clicked the first link which brought me to Cookinglight.com and I stumbled upon this great recipe of Grilled Balsamic Skirt Steak, Sauteed Baby Spinach, and Tomato-Vidalia-Blue Cheese Salad.  The man picked up the ingredients while I was at work and we whipped the meal up in no time when I got home.  We shared the responsibilities – Pat did the steak and potatoes and gave me the job of cooking the spinach and tomato salad.  I give this recipe two thumbs up and a definite go-to in our repertoire!  Here’s what it came out like and below is the recipe:

Yum, yum, yum!

Yum, yum, yum!

Sautéed Baby Spinach

Ingredients: 

1 (10-ounce) package fresh baby spinach (Which will seem like a lot but it wilts down to nothing!)

2 teaspoons butter

3 thinly sliced garlic cloves

1/4 teaspoon kosher salt

1/8 teaspoon black pepper

Directions:  Melt butter in a large skillet over medium heat. Add garlic cloves; cook 1 minute. Sprinkle with salt and  black pepper. Gradually spinach; cook 1 minute or until spinach just wilts, tossing frequently.
Tomato-Vidalia-Blue Cheese Salad:

Ingredients:

1 tablespoon EVOO

1 1/4 teaspoons white wine vinegar

1/8 teaspoon black pepper

2 1/2 cups halved grape tomatoes

1/3 cup diced Vidalia onion

3 tablespoons crumbled blue cheese

Directions:

Combine extra-virgin olive oil, white wine vinegar, salt, and pepper. Toss with tomatoes and onion. Sprinkle with crumbled blue cheese.

Grilled Balsamic Skirt Steak Recipe

1/4 cup balsamic vinegar

1 tablespoon Worcestershire sauce

2 teaspoons dark brown sugar

1 garlic clove, minced

1 pound skirt steak, trimmed and cut into 4 pieces

Cooking spray

1/2 teaspoon kosher salt, divided

1/4 teaspoon freshly ground black pepper $

Directions:

Combine first 4 ingredients in a large zip-top plastic bag. Add steak, turning to coat; seal and marinate at room temperature 25 minutes, turning once. Remove steak from bag; discard marinade.

Heat a large grill pan over medium-high heat. Coat pan with cooking spray. Sprinkle both sides of steak with 1/4 teaspoon salt and pepper. Add steak to pan; cook 3 minutes on each side or until desired degree of doneness. Remove steak from pan; sprinkle with remaining 1/4 teaspoon salt. Tent with foil; let stand 5 minutes. Cut steak diagonally across the grain into thin slices.

And for the potatoes just wash and scrub, slice into quarters, eigths, or shape of your size and simply sprinkle with some EVOO, salt, pepper, and rosemary.  Bake in the oven at 350 for about 40 minutes or until they are to your liking.

I’d love to know if you try this one out – let me know how you like it!  Bon Appetit!!!

❤ Jessi

Rate This Recipe!