Paint Chip Calendar

Image

I saw this project on Pinterest and just HAD to try it out for myself.  There were a few variations but I decided to go for a dark to light gradient from the bottom left up to the top right, using varying blues to match my living room decor.

For a considerably impressive looking item in the home, there are just a few short instructions to make this project!  Here are the instructions:

1 – Go to your local hardware store and gather multiple paint chips of the same family, in order.  Make sure you have at least 35 “boxes” worth if you are going to do five rows of seven, as pictured.

2 – I cut my paint chips into 1″x2″ rectangles with rounded corners- but others I saw online simply included the whole paint chip, color name on the front and all!  It’s up to you, of course, and what paint chips you have access to.  (You can see below that the ones I had only had four colors per card so I chose to cut them up…)

PaintChip1MARKED

3 – Purchase a frame from a store, find one at a yard sale, or re-purpose one that you already have.  Just make sure it’s big enough for your potential calendar! (I bought a 11″x14″ frame and but then ended up with this 14″x18″).  I got this one on sale from K-Mart for $18.74 (originally $24.99)!

4 – Glue or tape (I taped), the squares on a piece of paper (I used the back-side of the one that came in the frame!). hehe

5 – Don’t forget a place to write the month, and some tabs for the days of the week!   I used a Sharpie and wrote on the paint chips so the days are permanent.

6 – Put the frame back together and get some dry-erase markers and you’re all set!

You’re sure to get plenty of compliments.  Google “paint chip calendar” for more examples of colors, color arrangements, etc.  Some people randomized their colors, others did each full row a separate color, or I also saw one that was a gradient of colors (full rows) from bottom to top.  Let your creativity fly and enjoy having a calendar you can use forever that is as personable as they come!  Happy crafting!

❤ Jessi

Spaghetti with White Clam Sauce for One

Image

There’s something about catching your own food that is so rewarding.  That was the task at hand for me on a recent Wednesday evening where I had a bowl of fresh clams in the fridge from the previous Sunday when I was out on the Great South Bay with my family.  We go clamming pretty often so I frequently give clams away to friends, or make different recipes in order to use the clams before they go bad.  Since the clams were in the fridge and not steamed and frozen for future use, I knew that I had to get a good recipe on the stove that exact night or forfeit our bounty.

Now, I’ve made baked clams, clams casino, plain steamed clams with butter, and I’ve shucked and eaten them raw.  The two recipes left on my “Clam Cooking 101” list are a good clam chowder, and a clam sauce over pasta.  I decided to tackle the clam sauce and was extremely surprised and happy with how simple this recipe came out to be!

As a base-recipe, I used this one from the Food Network by Chef Anne Burrell.  It was a bit confusing at first because I realized she was cooking FIVE DOZEN clams whereas I was cooking for one person and decided to go with a dozen clams.  While I chopped down the amount of clams by 1/5, I simply halved the rest of the recipe to ensure there was ample sauce and flavor.  Here is how I made this dish for one:

Ingredients:

One dozen little neck clams

Four cloves of garlic

1/2 cup white wine

1/4 cup water

1 pinch crushed red pepper flakes

1/2 pound thin spaghetti or angel hair

1 tablespoon butter

1 tablespoon parsley

1 tablespoon oregano

Extra Virgin Olive Oil (EVOO)

Parmesan cheese for topping

Directions:

1 – Clean the clams!  I like to leave them in water for a day and let them flush out their systems themselves, and then scrub the shells clean.

2 – Start the boiling process of your salted water in a large pot.

3 – Coat the bottom of a large frying pan with EVOO and half of the garlic cloves.  Saute the garlic on medium heat until the garlic is fully browned.  One thing I learned from Anne Burrell in this recipe is that once the garlic turns brown, you have to scoop it out with a slotted spoon and discard it because it has, “fulfilled its garlic destiny.” (LoL)

4 – Add the water, wine, and clams to the pan and cover.  Bring them to a boil until the clams open up, about 10 minutes.  When clams are opened, reduce the pan to low heat and use your slotted spoon again to remove the clams from the pan (except for about three for decoration).
5 – Is your water boiling yet?  Time to cook the pasta!
6 – After a few minutes and when the clams have cooled, remove them from the shells (shells can be discarded) and give them a good chopping on a cutting board.  Add them back into the pan with the butter, herbs, and a pinch of crushed red pepper.
7 – When pasta is al-dente or cooked to your liking, strain and then add back to your large pot.
8 – Top the pasta with the clam sauce, but be sure to pour slowly and use your slotted spoon once again to assist the clam pieces out of the pan.  Also, make sure to sacrifice the last bit of sauce by leaving it in the pan to be discarded, as it may have excess sand or dirt in it from the clam shells. Toss the sauce and pasta together until they cling to each other and the pasta is equally coated.
9 – Dish your serving into a bowl and add some parsley, Parmesan cheese, and the few clams that you put aside earlier for garnish.  Serve with a slice of garlic toast if desired.
That’s the easy-peasy white clam sauce recipe that I slapped together in 20 minutes on a weeknight and definitely plan on using again!  Enjoy!

Closet Overhaul Begins…

It has begun.  I can’t take it any longer.  I can’t stand to look in my closet anymore (when you see the “before” picture below, you will totally understand).

Seriously, what girl doesn’t want the perfect closet? Well, for the past 1 year and 3 months I was lucky enough to have a semi-walk-in closet in my possession.  What did I do to make it pretty?  Nothing.  I am so disappointed with myself.  So, I have put my foot down and have decided to make it something I’m proud to look at and “shop” in every day.

(Side anecdote:  When we first toured this apartment, Patrick didn’t even want to give me this closet.  The moment I saw it I said, “Oooh! My future walk-in closet!”  To which he replied, “No wayyyyyyyy!” and he swore up and down that it wouldn’t end up being my closet… but clearly, I won. Hehehe.)

There are a few things you should know about me, and about this closet before I begin explaining my overhaul to you:

1) This is not the only closet I have in the apartment that stores my clothes and shoes.  I also have half of the closet in our bedroom (you know, a standard double sided closet with one bar and one shelf), as well as all 8 drawers in our horizontal dresser in the bedroom.  (That gives Patrick the 6 drawers in the vertical dresser and half of the standard closet).  Sounds about right for the male to female closet space, right!?

2)  There are indeed many things I believe I did “wrong” in this closet, such as my regular t-shirts (like the ones with graphics on them that you get at different events and such), sweatshirts, as well as my workout gear is in here.  Perhaps I could make this work, but my initial thought is that I don’t think those are very glamorous things to have in your walk-in closet – or at least at the volume that I possess.  Therefore, my plan is to get rid of a majority of the items, or switch them with something else’s “home” in the apartment and in turn I have to bring that something else in.  I am not going to just move stuff out of the closet and put it somewhere else to have a beautiful “end” photo – this is going to be for full function, and for real! 🙂

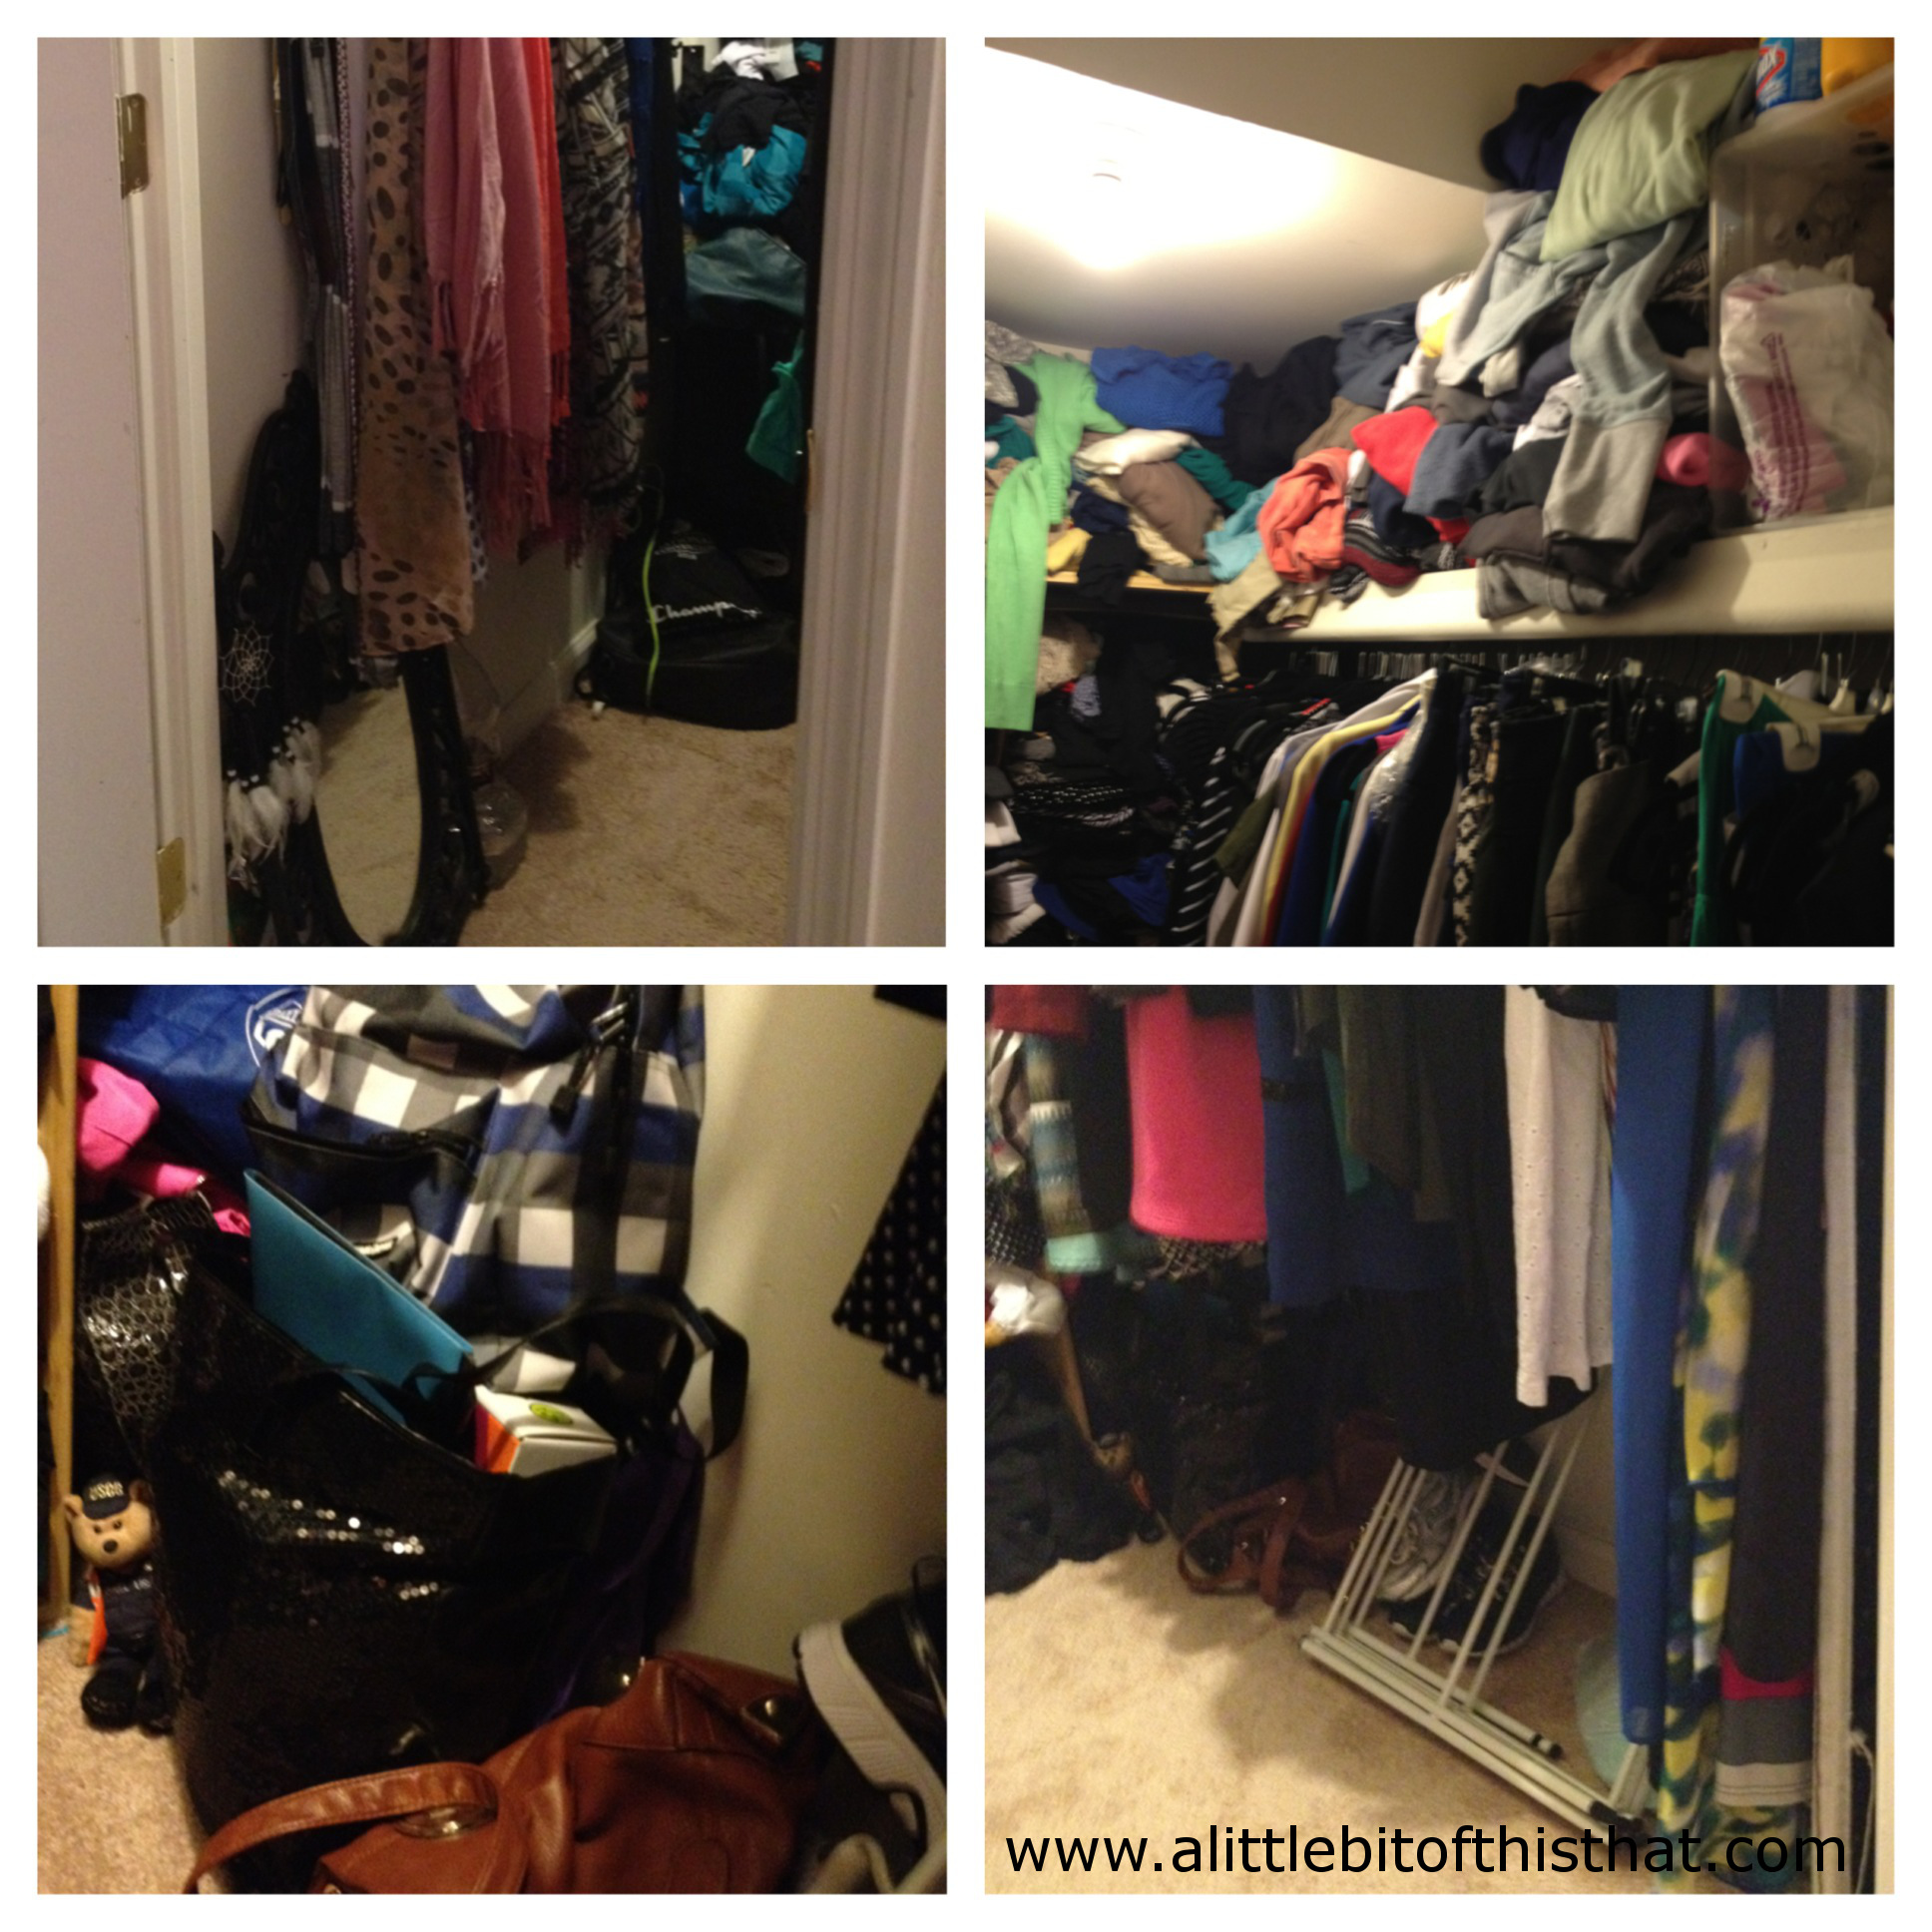
3)  Speaking of what I have “wrong” in the closet – let me tell you what this closet currently (summer season) contains:  All scarves, belts,graphic t-shirts for working out/bedtime, t-shirts for daily wear (solid and pattern), long sleeve t-shirts,  sweatshirts (zip-up and hoodies), thin-ish sweaters, beach coverups, all dresses, all blazers and suit jackets, some skirts, pocketbooks/wallets, ALL bags (like those grocery store totes and other freebies/drawstring/backpacks/sleepover duffels), hats, laundry detergent and other laundry-related items (sewing kits, dryer sheets, handheld steamer, ironing board, drying rack, etc.), Zumba clothes and other workout gear, my zumba bag, sneakers, my grandmother’s oil lamp, an old mirror from my childhood bedroom, and a Coast Guard bear that Patrick gave me.  See if you can find all of those things in the photos below.  This is like a game of Where’s Waldo! LOL!

4) Random sidenote:  I am a FIRM believer that shoes do not belong on the shelf that is above the hanging bar.  Your shoes are your barrier against all of the dirt and other crap (pardon my french) that you walk in every day.  Shoes go on your feet.  They stay on the ground or somewhere that will always be designated for shoes only.  Oh, and when they are packed in a suitcase they go in a bag and not rubbing against all of your clothes.  Phew!  Sorry for the quick rant.

5)  I believe it’s human nature, that, depending on how much space you have, you will acquire “stuff” to fill it and soon need more space.  I have called two different rooms in my parents house mine, two dorm rooms, a room in a house in Queens, and shared a bedroom in Italy all before moving into this apartment.  I’ve always started with ample space and within due time it could be considered cluttered.  It’s time to minimize, folks!  That is exactly what I am going to try and conquer in this mission.

Okay, I’ve procrastinated long enough.  If you have OCD you may want to look away – because against my better judgement, here are the incredibly embarrassing “before” pictures of my closet:

From the outside looking in at the monster...

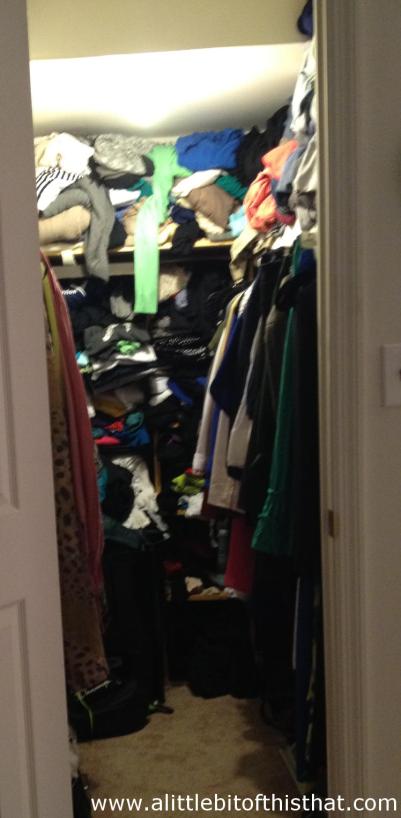
From the outside looking in at the monster…

I'm not Italian and I don't get Agita but I'm pretty sure this closet could give anyone agita! lol

I’m not Italian and I don’t get Agita but I’m pretty sure this closet could give anyone agita! lol

A few closer looks at the nooks and crannies...

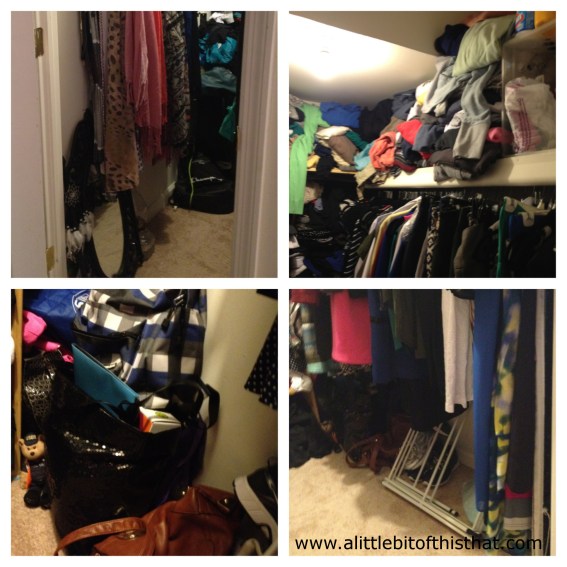
A few closer looks at the nooks and crannies…

BUT!  Then the process to organization began. (Yes, it’s okay to breathe a sigh of relief…)

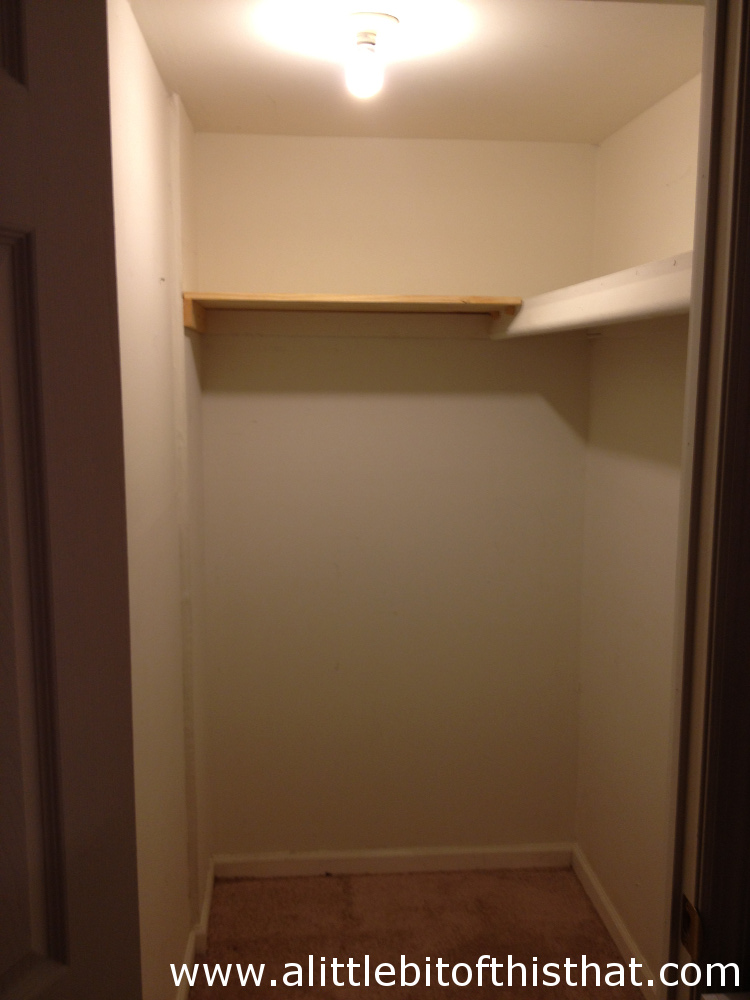
STEP 1:  Empty everything out:

There's nothing like starting with an empty canvas!

There’s nothing like starting with an empty canvas!

STEP 2:  I vacuumed the closet and sprayed down the shelves with some dusting spray. (Optional but I’d advise doing this since you have access to all nooks and crannies of the closet!)

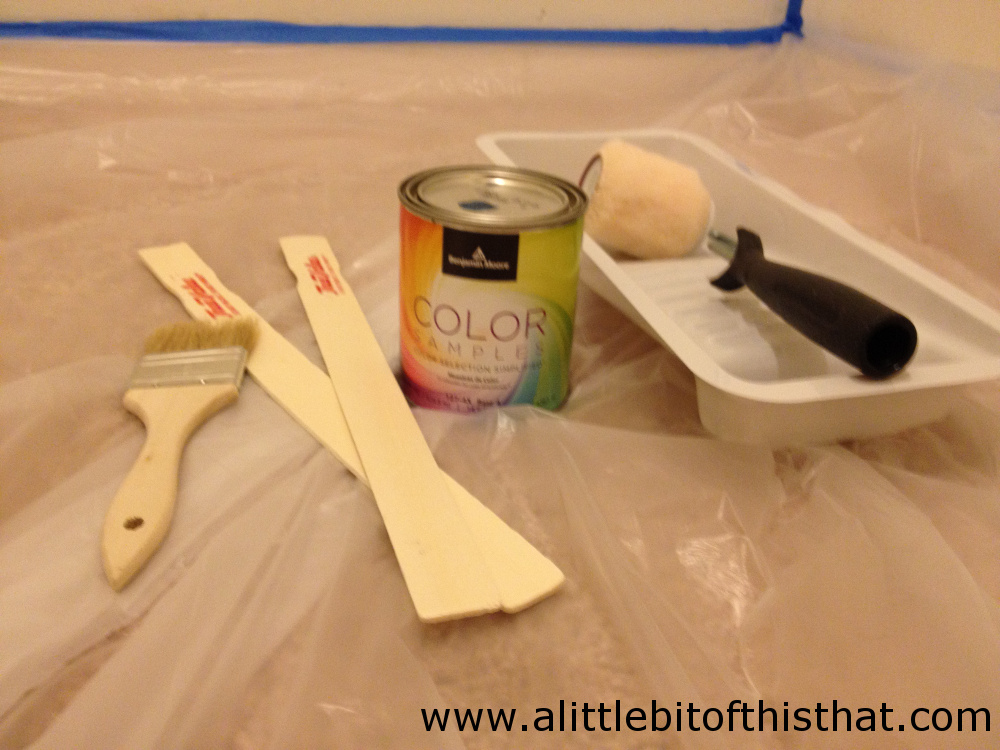
STEP 3:  I decided to paint the back wall as an “accent” wall to add some beautification to the closet.  I went to my local hardware store and spent just about $20 on supplies.  ($7 – Paint sample can… plenty for this one wall, $3 mini roller pan and roller set, $3 drop cloth, $6 painter’s tape, $1 brush).

**DISCLAIMER: This is the first interior wall I have ever painted in my life!! It was so much fun but in no way do I claim to be a professional painter but this was so much fun to try!  You will notice I even changed my mind in the middle – I thought I wanted all shelves painted then decided against it. 😉 All I have to please is myself and I’m happy with it. 🙂

My supplies!

My supplies!

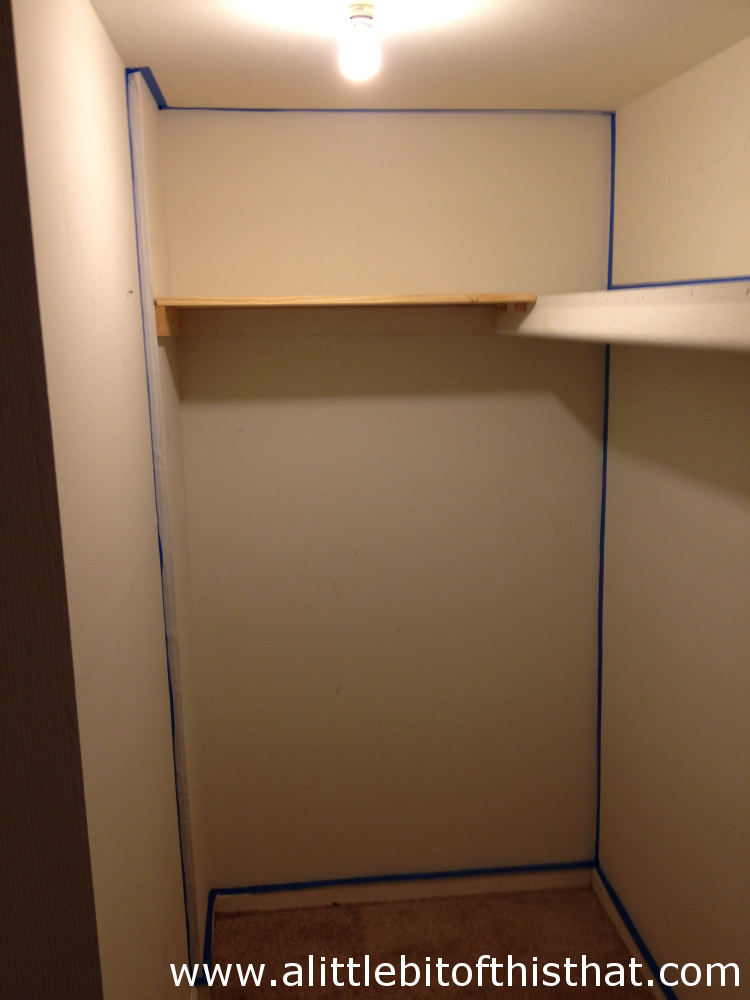
Step 4:  “Mask” your canvas by applying painter’s tape to the perimeter of where you plan on painting.

Edges are all taped up...

Edges are all taped up…

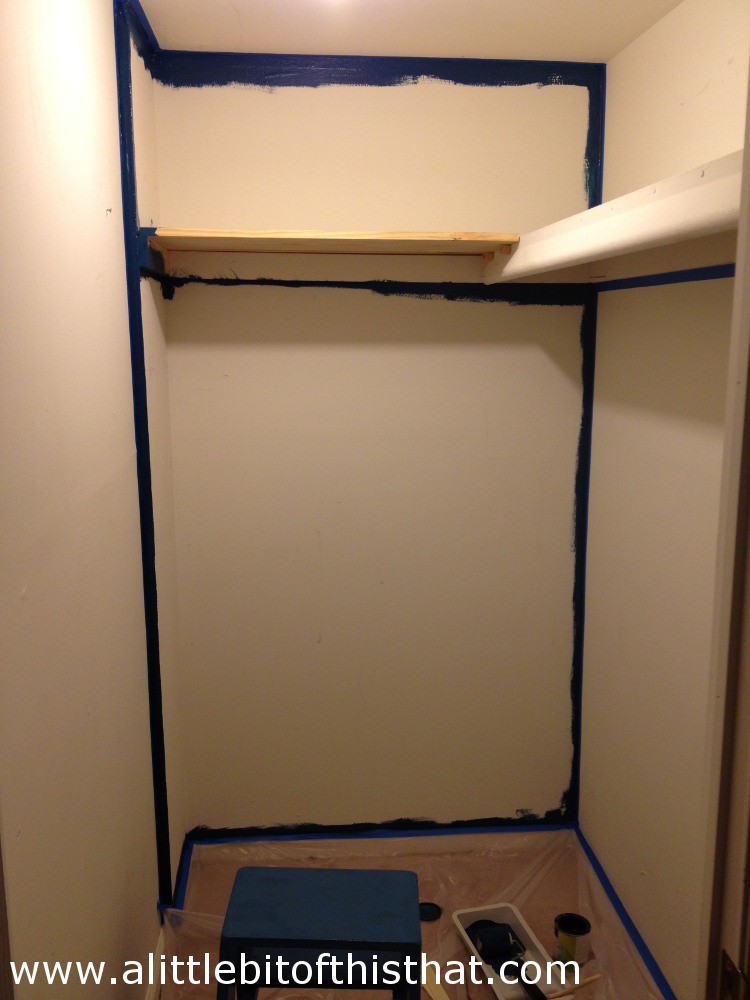
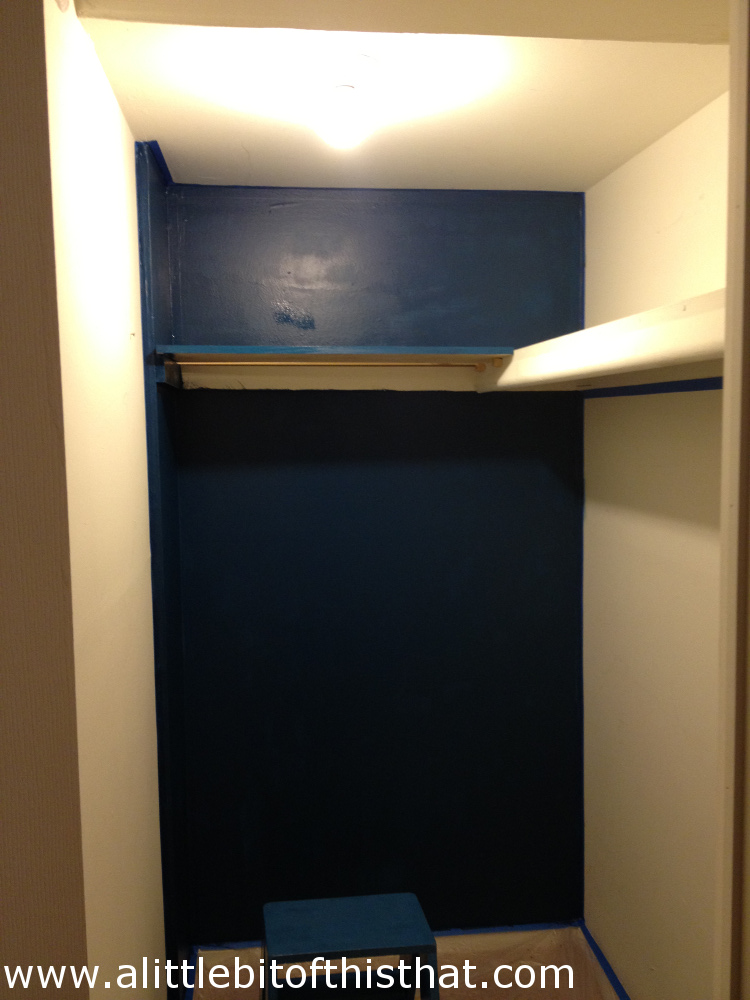
Step 5: Paint the trim with a brush…

EmptyClosetTrimMARKED

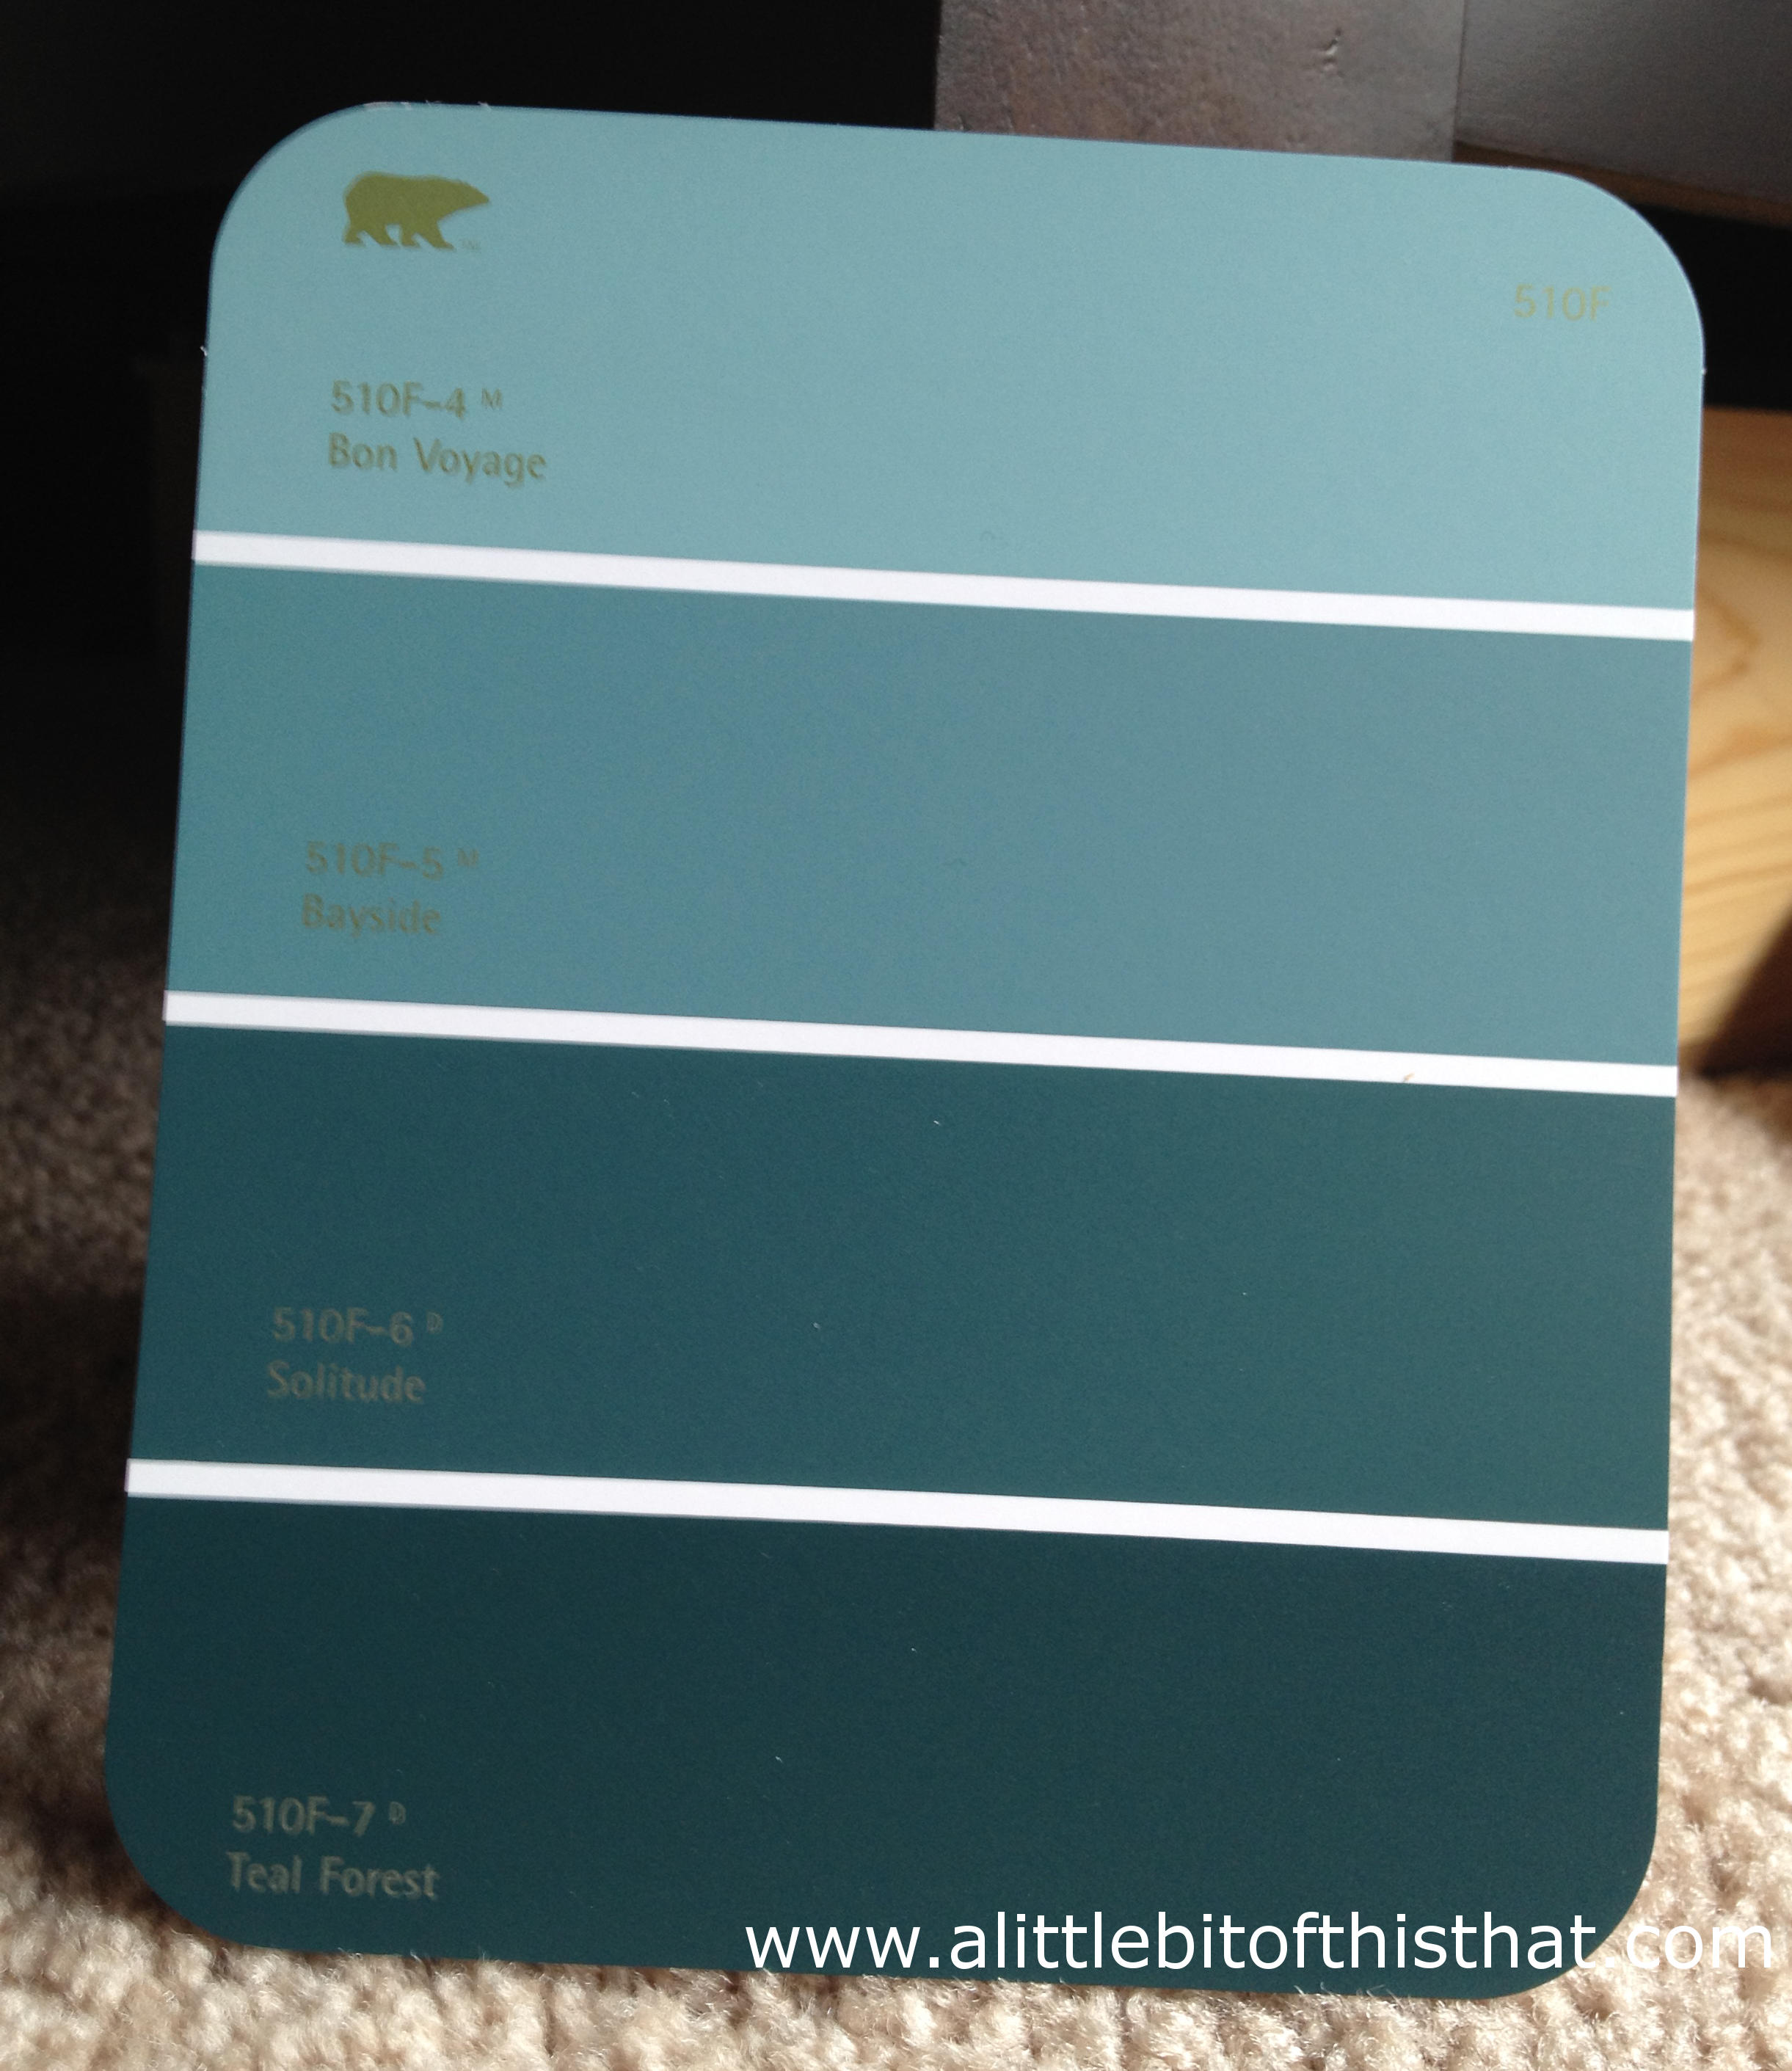
Step 6:  Use the roller to fill in the rest!  (FYI – The color I chose was Benjamin Moore’s “Slate Teal”)

EmptyClosetPaintedMARKED

So, that’s where I’m at right now!  “After” photos will come soon… I promise!  I’ve already been busy sorting through every article of clothing and rearranging/beautifying this closet and I’m almost there!  I want to feel like when I walk in there, I am shopping at a store for an outfit.  It’s going to be both pretty and functional so keep checking back – I’ll have some amazing photos up soon!

A Beautiful Morning to Begin a Weight Loss Battle

Since Patrick and I started dating a little over two years ago, I’ve gained 30 pounds.

I know, I know – it’s somewhat normal and expected to gain weight in a relationship but this isn’t good at all – not for me or for Patrick, who has weigh-ins coming up in a few months for work.  I don’t know about you, but this weight gain phenomenon has happened to me in almost every relationship I’ve ever been in.  Granted, this is my worst, and that’s exactly why I now need to put my foot down and focus on me.  Why do we let ourselves go?  Here are a few reasons that you are probably familiar with but I’ll remind you of these culprits for fun, or at least from my experience.

1) When we are in a relationship, we are comfortable!  We got the guy (or girl) and we aren’t “fishing” anymore in that vast sea.  No need to be in tip top shape to impress or attract a potential fish-mate.

2) We want to spend all of our time with that person.  Especially in my situation, where my boyfriend’s and my schedules rarely match up – when we are together, I want to be with him!  I don’t want to be running off to an exercise class or to go for a run and part ways with him.  So we end up relaxing in front of the TV together, or even worse… (continue to #3)…

3) Your time together usually involves meals, and those meals aren’t always healthy.  Conversations and memories are made over a meal, and these meals are usually had out out at a restaurant where you are “treating” yourself.  Therefore, the calorie intake is rarely paid attention to, or you justify your actions with a celebratory, or an “I deserve this” type of mindset.  Not to mention that random weekdays by the TV sometimes end in the venturing out for a “treat” such as ice cream.  Relationship or not – you could probably tell by my food posts that I love eating, and that’s not something I’m entirely willing to give up.  (And I haven’t even gotten into the calorie content of alcohol!).  So, I’ll have to find another way (or some additional activities) to help me battle this bulge.

As I was going to bed last night and thinking about these things, I prepared myself to begin to combat this relationship poundage.  I figured I’d at least start by taking a few extra steps outside of my comfort zone in order to prove that I mean business.  So, today I added in a run, but not just any run.  Today I ran BEFORE work.  I am 27 years old.  I don’t think I’ve EVER fit in exercise before school or work EVER, unless it was mandatory on a team (and normally any dance team, cheerleading, soccer, or lacrosse practices I had in the past would only be in the morning on days that we didn’t have school afterwards).  But the alarm went off at 6:00am, and around 6:40am I stumbled out of bed, brushed my teeth, threw on some workout clothes, and hit the pavement around 7:00am.  (Waking up on cue to my alarm and not using the snooze button is a whole other task I’ll try to combat one day… lol).

And let me tell you, I’m so glad I got out of bed and went out for a run.  It was beautiful!   I mean, it wasn’t even that early but there were very few people out and about and it was just so peaceful.  The sun was shining, yet there was a lot of dew in the air (or perhaps it had rained throughout the night).  I had tunes blasting in my headphones as I was working out my body.  It was wonderful!  Here are some of the pictures I grabbed during my peaceful run:

The run can wait... I couldn't help but stop and take some photos!

The run can wait… I couldn’t help but stop and take some photos!

Weeks Road - Usually VERY busy yet it was so peaceful today.

Weeks Road – Usually VERY busy yet it was so peaceful today.

A canal/bridge that I passed over on my run.

A canal/bridge that I passed over on my run.

On any given day the Patchogue River is bustling with boats.  This morning?  So tranquil and not an engine to be heard. (PS - That's Patrick's boat right there) :-)

On any given day the Patchogue River is bustling with boats. This morning? Look at that tranquility.  Not an engine to be heard. (PS – That’s Patrick’s boat right there) 🙂

Guilty as Charged... here I am sweating but smiling.  So happy with my decision.

Guilty as Charged… here I am sweating but smiling. So happy with my decision.

My run. :-)  Love the Nike+ Running app!

My run. 🙂 Love the Nike+ Running app!

I am hoping that this is the start to getting back on track with my weight-loss goals as I commit myself to some additional training (and maybe even a little bit better eating habits).  I hope this post has inspired you in some way as well!  Especially you, Patrick – countdown to October weigh-in’s has begun.  Let’s kick some weight loss butt, starting now!!

Summer-Flower-Retro-SunshineMARKED

Zumba Summer Sale!

Hi everyone and happy Wednesday to you!

It’s still early but my hump day already started with a smile on my face.  If you know me personally or at least have read my Meet Me! page, then you know that I teach Zumba as a part time job.  Well, as I was driving to work today a random question popped into my mind so I started the day with a visit to zumba.com to access my instructor dashboard as well as the ZIN (Zumba Instructor Network) forum to answer my question.

Low and behold, the first thing that caught my attention was a big graphic that says “SUMMER SALE – UP TO 50% OFF!  HOT SUMMER SAVINGS!”  You know I had to go.  Zumba clothes aren’t cheap and my wardrobe could use a few new pieces!

Well, let’s just say that I am now the proud owner (or at least, purchaser – but I’ll own them in a few days when they arrive!) of 13 items, for a grand total of $163.05.  Here’s my bounty!  I can’t wait!

zumbasummersale

Between these pieces and some I already have in my Zumba Fitness wardrobe, I think I have a lot of mixing and matching possibilities, don’t you?  I can’t wait to wear the Totally Twisted Top with a bright bra underneath (maybe the yellow Flash V-Bra?) and leggings.  Or, the Radius Bubble Top (which i have in black already – can’t wait to own the purple!) with the Spark Capri Leggings for a quick no-effort outfit when I’m packing my gym bag in the morning.

So, in the end I was curious how much I saved with this Summer Sale.  I added up the regular prices and  it turns out that I saved a total of…. (drum roll please….!): $244.50!!!!!!!!!!!!!!!!!

I hope you get a chance to check out the Summer Sale while the items are still there!  Believe me, I’ve seen things on their site before and didn’t purchase them and they were soon GONE!  Even better – since you can’t get the ZIN Price (I’ll explain more about the ZIN membership another time), I can offer you one consolation:  Enter the promo code “JP0511” for an additional 10% off your purchase. 

Happy shopping!  Peace, Love, Zumba!

“Working with what you’ve got” = Homemade Pork Fried Rice

I hope you had a chance to read all about the wonderful upstate N.Y. town of Lake George and my recent vacation there!  Well, before we (Patrick and I) went away, we chose not to go food shopping for about two weeks prior.  It was a challenge that we took upon ourselves to both save some money for vacation, and to try to empty out our freezer, fridge, and pantry of the items that we seem to pass over when planning dinners.  The goal was to work with what we’ve got.

As we scoured the freezer to see what we were working with, we decided to start with a package of thin-sliced boneless pork chops as our base.  Now, in the man’s brain he automatically went to pork chops on the barbeque with mashed potatoes.  My female brain (as most female brains probably are) decided to start checking out the endless condiments that we have on the door of the refrigerator.  Hmnn… we have a wok, and I once made beef mei fun (thin rice noodle) so I had plenty of leftover asian sauces, and there are peas in the fridge.  The only thing I had to buy were the scallions.  Bingo!

I proposed the idea of pork fried rice.  “With what else?” Patrick said to me.  “No, that’s the meal,” I countered. “It has meat, grain, and veggies all in one.  It’s perfect!”  And that is how I got my way and how the following recipe is here for you.

Homemade Pork Fried Rice... Delish!

Homemade Pork Fried Rice… Delish!

Ingredients (This will feed about 4-6 people comfortably, as a full meal – or more people as a side)
One package (Ours was almost a pound and a half) thin boneless pork chops

6 cups white rice

8 eggs

One package frozen peas

One small cluster scallions

Sesame Oil

Oyster Sauce

Soy Sauce

Directions

1.  Bring six cups of water to a boil in a large saucepan.

2.  While the water is boiling, slice the pork chops into thin strips or small cubes (to your liking), and place in a dish with oyster sauce to marinate.

3.  Cut the scallions into rings and place aside as well.

4.  When the water boils, add the rice, cover, and remove from heat.  In 10-12 minutes, check back on the rice and fluff it with a fork.

5.  Time to cook with the wok!  You could probably do most of these in any order but here is the order I did:

6.   Scramble the eggs in the wok, place aside.

7.  Line the wok with sesame oil.  Cook the marinated pork until just about well done, place aside.

8.  Cook peas and scallions until just about well done – leave in wok.

9.  Coat the wok with more sesame oil.

10.  Add your previous ingredients – eggs, pork, and rice and mix together!  (We needed to do this in two different batches!) Keep the heat on, and add more oyster sauce and soy sauce to your liking.  Toss and mix around ingredients frequently.

Here are some pictures of my experience:

Pork chops... never my first choice of meat for some reason but this recipe tasted great!

Pork chops… never my first choice of meat for some reason but this recipe tasted great!

Here are the sauces I had leftover that I used. :-)

Here are the sauces I had leftover that I used. 🙂

Eggs First

Eggs First

Meat second...

Meat second…

Veggies third!

Veggies third!

Everything together!

Everything together!


Vacation Destination: Lake George, N.Y.

I’m back!  That’s right, we all deserve a vacation sometimes and that’s exactly what I did!  If you read my post about Rachael Ray and upstate New York then you may already have guessed where I was.  Sure, there’s internet access up there (not at our houses though) and it’s not the boonies by any means.  But nevertheless, when we go upstate (and as it should be on any vacation!) we try to appreciate the place we are visiting and squeeze in as many activities as possible; so blogging wasn’t even an option.

Now that I’m back, let me share some of my favorite things about the Lake George area in this “Vacation Destination: Lake George, N.Y.” post.

1) The house that we stay at.  Sorry, but this is one thing you won’t be able to experience but I have to say it first and foremost because it’s a great house!  It’s built right into the mountain so neither story feels like an upstairs or a downstairs.  Patrick’s parents did a great job when they bought this house two years ago, and his mom has a great HGTV-like eye for decorating.  The house has a cozy upstate feel without being too overly/commercially “Adirondack”.  The yard is huge – there’s a firepit way out back, and a smaller patio with a chiminea where you can sit and be near the house.  Bonus:  The bedroom that Patrick and I stay at is on its own floor so it feels like a little apartment.

2) The LAKE!  Here on the south shore of Long Island, I get to enjoy both the bay and the ocean but taking a dip in the fresh water lake is the most refreshing feeling ever.  Plus, it’s huge… and absolutely gorgeous!  There are so many things you can do on the lake – swim, rent a boat, kayak, canoe or row, jet ski, go tubing, just lay on the shore on a rock or on a beach.

Sharing a canoe trip on the lake with my love!

Sharing a canoe trip on the lake with my love!

3)  The laid-back feeling.  We never really pay attention to time or keep a tight schedule when we are up there – whether it’s just me and Pat, with his entire family, or even when I used to go up with my family!  We know the activities we want to do and may designate a day for them but for the most part we go with the flow.

Believe me, there are plenty of activities in Lake  George so there’s no way you can fit them all in but that leads me to the next thing I love about Lake George!

4) There’s lots of activities besides the lake for when you decide to stick to dry land!  For example, you just have to play a round of mini-golf while you are there.  Whether it’s at Pirate’s Cove, Around-the-World, or at Hillbilly Fun Park (where we went this time around), there is nothing like a little sport and friendly competition.  (PS – Click Hillbilly Fun Park for a coupon!  Also, if you play there – you MUST try their ice cream.  It was delicious, fresh, huge portions, and inexpensive.  The best of every world possible.

This is at the "Around the World/Around the US" golf course.  This hole is for Maine!

This is at the “Around the World/Around the US” golf course. This hole is for Maine!

Another must-do activity, or at least worth a visit is the Adirondack Winery.  I love going to the tasting room in the middle of Lake George Village where you can sample SEVEN of their wines for $5, and keep the glass too.  You can shop for their homemade cheeses, have a wine slushy, and shop their novelty gifts.  We love trying the wines every time and bringing some bottles back home with us – and represent the Adirondack wines here on Long Island!  *One disclaimer:  It is a tasting room which therefore has no chairs or public restroom.  Plan some time to stay and check out all the goods but not too much time!

There are so many activities that I haven't even mentioned hiking yet!  What beautiful views from the top!

There are so many activities that I haven’t even mentioned hiking yet! What beautiful views from the top!

5) Shopping!  Not that Patrick is ever happy with this one at all, but right off the NYS Thruway are a bunch of outlets and if the weather’s bad, it never hurts to check out the sales!  I also like checking out the stores in Lake George Village where you can get a nice piece of sterling silver jewelry, a souvenir t-shirt (I’m a sucker for souvenir t-shirts… especially tie-dye or a cool women’s cut), or any trinkets that will always remind you of your trip!  Or, hop in the car and go to Bolton Landing just north of the Lake George Village (be sure to visit the Indian Teepee gift shop!), or go exploring and stumble into some other small neighboring towns where you can go antiquing, or cities such as Lake Placid to learn about each town’s uniqueness!  🙂

Overall, there really is so much to do upstate that I could go on and on about… and I haven’t even gotten into the historical aspects of the land up there, or where the good places to go to EAT are!  I’ll leave more discovering up to you and www.lakegeorge.com but of course, feel free to comment if you are planning on heading there and have any questions such as advice on where to stay, etc.  I’d love to help you out!

Thanks for discovering Lake George with me, one of my favorite places to vacation.  I hope you get to visit soon!

Random Adirondack chair in a random town.  What's more Adirondack than this? lol

Random Adirondack chair in a random town. What’s more Adirondack than this? lol

Flashback Friday – 7/12/13 – Study Abroad 2007

It was one of the best trips of my life and yet it wasn’t something I could have ever imagined doing in my wildest dreams. In the winter/spring of 2007, I spent four months overseas in a study abroad program through my college, St. John’s University.

Now, I didn’t push for this myself. I remember my mom saying, “You should look into that study abroad program and the scholarships it comes with. It looks like a great experience!” Next thing I knew, I was at a information seminar with my fellow accepted students being told what the upcoming semester of my college life would entail.

My biggest problem:Four months.  I would have to pack clothes for the next FOUR MONTHS?  That was the biggest worry I had.  Hold on… wait… I don’t even own a large suitcase!  The last trip I had been on with the dance team, my mom sent me with her brown tweed luggage.  Okay, so vintage is in now but imagine being the only person toting one of these babies around when everyone else has the updated “upright” luggage.

This suitcase just screams 2007, right!?

This suitcase just screams 2007, right!?

So, I was lucky enough that one of my best friends since preschool, Tara, was generous enough to loan me her large suitcase for this semester-long trip.  With her classy (well, more like up-to-date, atleast) big and black upright suitcase, a HUGE red Nike St. John’s University dance team duffel bag, and a Billabong carry-on bag with flowers on it (sounds like a very matching, complimentary set, right!!?) I headed to the airport in my green velour suit where I said bye to my parents, took a deep breath, and got ready to board my first trans-Atlantic flight.  I was 20 years old.  Was I ready to face the adventures that awaited me?  It didn’t matter either way, the $700 flight and my semester fees were paid for and there was no turning back now.

Obviously, you know how this story ends.  It was the trip of a lifetime!  We were based in Rome near the Vatican (our metro stop was called “Cipro”).  Our school rents gorgeous, spacious apartments in a housing complex called Medaglie D’Oro, and the school was based a few blocks away.  I took 5 classes that semester including Art & Architecture, Italian  Level 2, Sketchbook, Theology, and Anthropology.   Even though we had classrooms, class was frequently held as field trips to other locations like the Roman Forum, the Colosseum, The Pantheon, Vatican City, Villa Borghese, Circus Maximus, Castel Sant’Angelo and more.  There were no classes on Fridays – we were expected to use each 3-day weekend as an opportunity to travel and explore… and that we did!

In addition to living in Rome and taking a group field trip to Brussels and Luxembourg, I also visited Florence, Venice, Cinque Terre, Siena, Torino, Pisa, Pompeii, Amsterdam, Paris and Barcelona.  Some trips we planned a little in a advance while others I was packing a backpack the night before and hopping on a 4am train.  We booked and stayed in hostels, read maps and tour guide books, and discovered new cities all on our own.  Although I would be amiss if I didn’t tell you that we had our fair share of fun, enjoying both the nightlife and the daylife on what sometimes felt like a four month vacation (don’t worry… I got a 4.0 that semester!)

During my spring break, my parents even came to visit!  They got to see Rome and other cities with me, something they never thought they’d do in their lives either.  Overall, I believe I matured and learned so much about myself on that trip and will always hold that experience dear to my heart.  I saw some amazing sights with some amazing people.  I hope we will all be friends for a lifetime and always remember the connection we have as the “Roma Crew” of Spring 2007.

Some of the group at the Coliseum in Rome during our Art and Architecture class.

Some of the group at the Colosseum in Rome during our Art and Architecture class, the first week of our trip.

Me in "sketchbook class" aka at a random museum.

Me in “sketchbook class” aka at a random museum.

At St. Peter's Basilica on Easter Sunday.  :-)

At St. Peter’s Basilica on Easter Sunday. 🙂

Happy 7-Eleven Day!

Happy 7-Eleven Day!

Happy 7-Eleven Day!

I have some real fun coworkers!  Today I got invited on an excursion with two of our crew members (in the company car lol) who wanted to visit as many 7-11’s as possible during our 1-hour lunch break for free Slurpees on this lovely 7-11 free Slurpee day!

Oh boy did we laugh and have fun!  It was an entertaining and amusing quest, and in the end we visited a total of six locations, for a total of 18 free Slurpees!!  Don’t worry, we didn’t get all hopped up on Slurpees ourselves – we gave a few away to coworkers when we got back.  🙂

Our final bounty!

Our final bounty!

According to myfitnesspal.com, a small (8oz) slurpee seems to average around 65-80 calories in the US.  Sugar-free varieties are only 20 calories!!  Promotion goes until 7pm tonight – hope you get a chance to get yours!  Thanks 7-Eleven!!

❤ Jessi

New Wrist Candy from Kohls

Had to have them!

Kohls.

Kohls.  Need I say more?  That store is so wonderful but so dangerous!  A recent trip set me and the man back $309.42, and that was after I looked at the $373 original price and said, “Oh heck, sign me up for the Kohls charge card and give me the dang 20% off today, please!”

Anyway, we are both really happy with our purchases.  I got a few really cute LC by Lauren Conrad tops, a set of two bandeau bra tops, two pairs of shorts (one is polka dotted!), a set of two Rock and Republic necklaces, and sunglasses.  Patrick got a bunch of shirts and four pairs of shorts. (Did I mention our sole reason for going to Kohls was to get shorts for both of us? Oops.)  But out of everything, the purchases that got me most excited were a few pieces of wrist candy I found in the “limited quantities” section.  The limited quantity jewelry is 60% off!

The first piece of jewelry that caught my eye is a gold bracelet that just seemed so versatile.  You want a nautical look? Check.  Classy look?  Check.  Egyptian? (LOL) Check.  I just loved the piece and the fact that it was stretchy so it fit perfectly.  It was labeled at $24 and, yup, with the 60% off it was only $9.60.

It was love at first sight!!

It was love at first sight!!

Honestly, I could have spent hundreds of dollars on the bracelets in the limited quantities section.  I wanted them all!  They all seemed like they could go together.  I couldn’t decide on silver or gold (I always start an outfit with either a gold or silver jewelry theme…) but I knew I had to be choosy.  So here are the other two bracelets I ended up with.  They were marked $20 each so they ended up being just $8 each.

So classy.

So classy.

There was just something about these bracelets.  They reminded me of Stella and Dot, or Lia Sophia… one of those jewelry companies where one would probably spend about $36 for each of the bangles (not to say I haven’t done it before… haha).  Plus I really liked the magnetic/spring loaded closures and oval shape for a better fit than just a normal circular bangle.

Well, thanks for checking out my wrist candy purchases – maybe I’ll get some photos up here of my other items with some original prices and sale prices for you to check out!  I can’t wait to wear all of my new stuff!

Have a great day!

❤ Jessi